这些小活动你都参加了吗?快来围观一下吧!>>
电子产品世界 » 论坛首页 » 企业专区 » Renesas » 赤色要塞组的进程

共26条 2/3 1 2 3 跳转至
助工
2012-12-04 23:31:02     打赏
11楼

SD卡的操作


要想操作SD卡一定要包含SDMMC那个库。否则编译时提示出错。


简单学习下SDMMC的库的文件:


begin 初使化SD卡。

      SDMMC.begin

      SDMMC.begin(int cspin)

      cspin为片选信号。

insert插入状态

      SDMMC.insert(bool ins)

exists 看文件是否存在

       bool SDMMC.exists(const char* filename)

mkdir 建立子目录

      bool SDMMC.mkdir(const char* pathname)

      成功返true 失败false

open  打开文件

      File SDMMC.open(const char* filename, FILE_MODE mode)

remove删除文件

      bool SDMMC.remove(const char* filename)

rename给文件重新命名

      bool SDMMC.rename(const char* oldname, const char* newname)

rmdir 删除子目录名

      bool SDMMC.rmdir(const char* pathname)


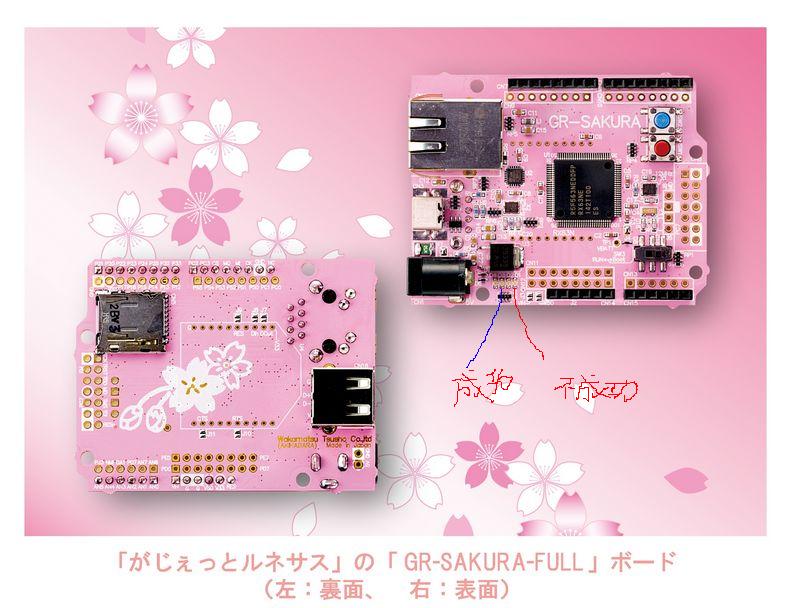
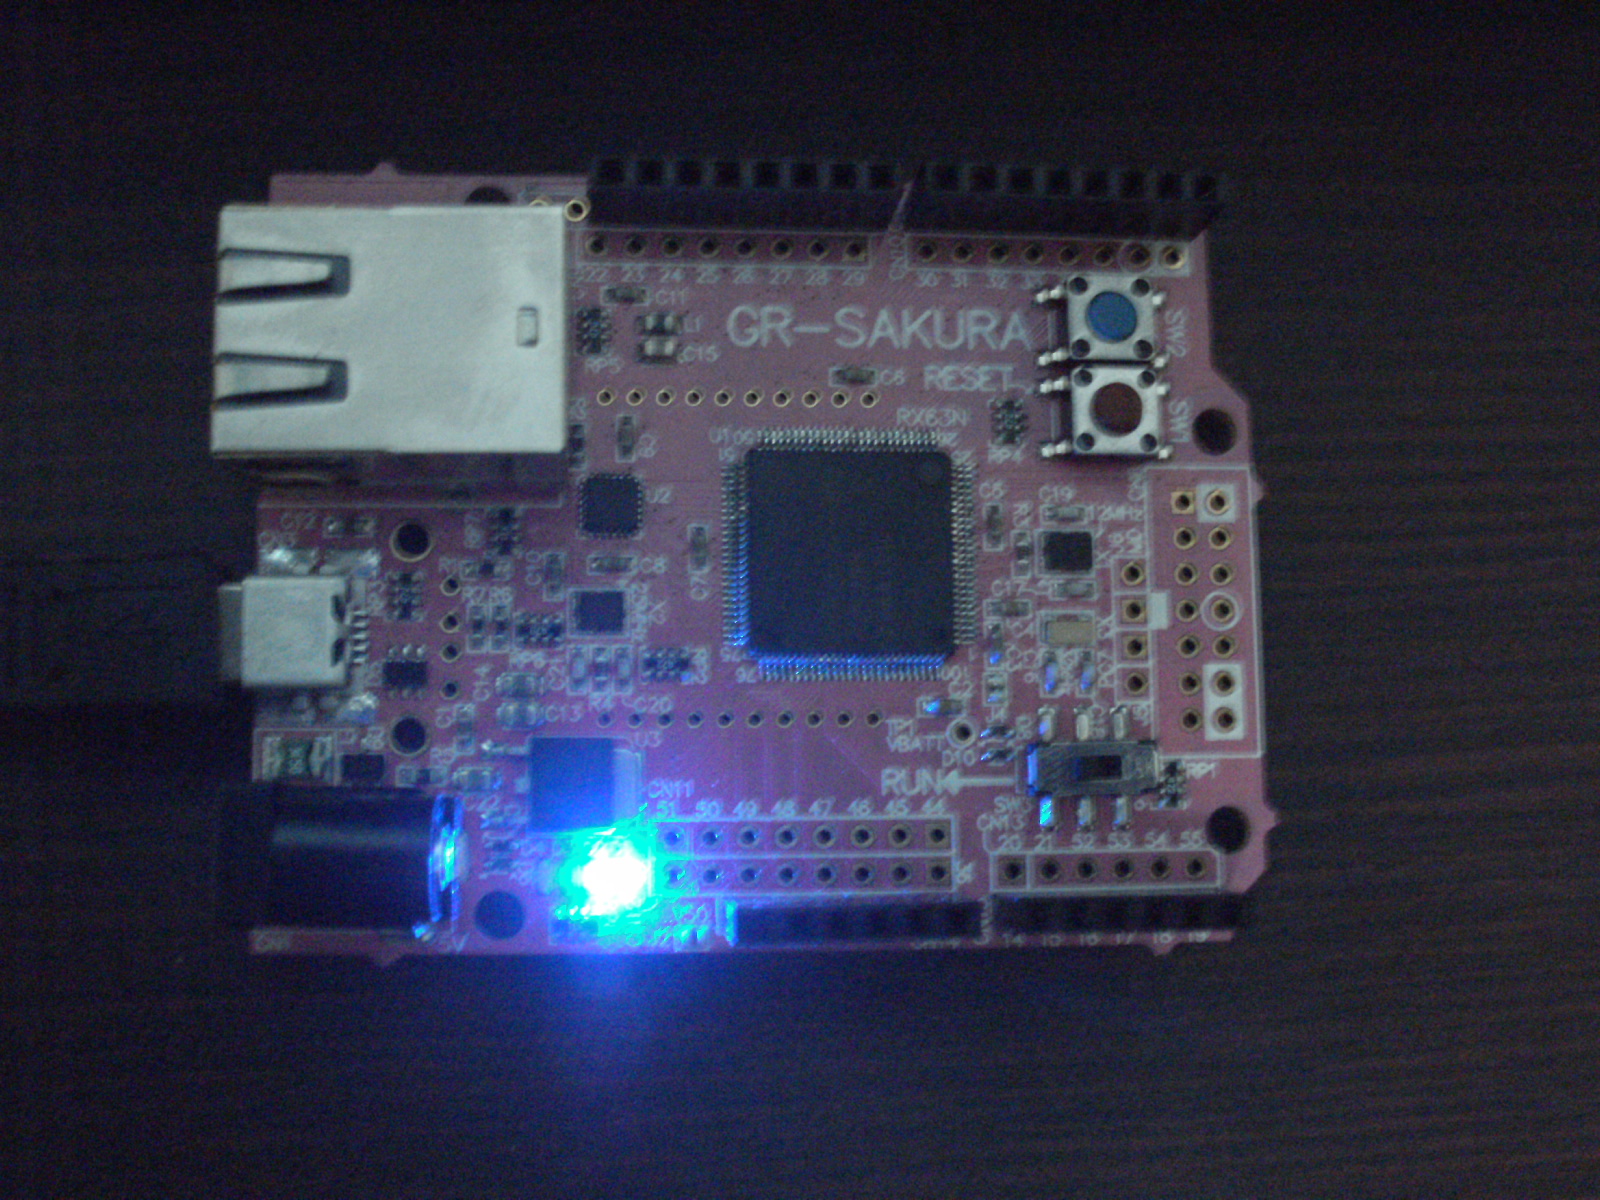
我下面的程序就是识别一下SD卡。当SD卡成功时第三灯亮,否则第一灯亮


以下是程序:


#include <rxduino.h>
#include <sdmmc.h>
typedef unsigned long DWORD;

DWORD get_fattime (void)

{

    return ( ((DWORD)2012 - 1980)  1);

}

SDMMC MicroSD;

File SdFile = MicroSD.open(__null);

void setup()

{

    Serial.begin(9600);

    pinMode(PIN_LED0,OUTPUT);

    pinMode(PIN_LED1,OUTPUT);

    pinMode(PIN_LED2,OUTPUT);

    pinMode(PIN_LED3,OUTPUT);

    MicroSD.begin();

}

void loop()

{

    SdFile = MicroSD.open( "Test9", FILE_WRITE );

    if( SdFile==false ){

        Serial.print("SdFile == false");

        digitalWrite(PIN_LED0, 1);

        while(true);

    }

    SdFile.print( "Test9" );

    SdFile .flush();

    SdFile .close();

    digitalWrite(PIN_LED2, 1);

    Serial.print("test ok");

    while(true);

}


高工
2012-12-05 19:41:08     打赏
12楼
好详细的哦哦!!!顶

院士
2012-12-05 19:55:24     打赏
13楼
楼主的11楼的链接应该为http://forum.eepw.com.cn/thread/223168/2#11 那个#号前面代表页码数。

助工
2012-12-05 21:27:30     打赏
14楼

谢谢JOB提示,我改去


助工
2012-12-05 21:48:32     打赏
15楼
GR-SAKURA开发板的原理图:黑白
gr_sakura_schematic_mono.pdf

彩色:
gr_sakura_schematic_color.pdf


助工
2012-12-05 22:01:01     打赏
16楼

用按键控制LED

利用蓝色按钮,来控制LED1,

这人是利用板子定义的宏 PIN _SW和PIN_LED0

当按下蓝色按钮时,LED0灭当抬起来的时候,就亮了。

以下是程序:


/*GR-SAKURA Sketch Template Version: V1.01*/
#include <rxduino.h>


const int buttonPin = PIN_SW;     // the number of the pushbutton pin
const int ledPin =  PIN_LED0;      // the number of the LED pin

// variables will change:
int buttonState = 0;         // variable for reading the pushbutton status

void setup() {
  // initialize the LED pin as an output:
  pinMode(ledPin, OUTPUT);     
  // initialize the pushbutton pin as an input:
  pinMode(buttonPin, INPUT);    
}

void loop(){
  // read the state of the pushbutton value:
  buttonState = digitalRead(buttonPin);

  // check if the pushbutton is pressed.
  // if it is, the buttonState is HIGH:
  if (buttonState == HIGH) {    
    // turn LED on:   
    digitalWrite(ledPin, HIGH); 
  }
  else {
    // turn LED off:
    digitalWrite(ledPin, LOW);
  }
}


助工
2012-12-10 23:19:57     打赏
17楼

对GR-SAKURA的网络接口的疑问

我的程序很简单如下:


#include <rxduino.h>

#include <Ethernet.h>

byte mac[] = {
  0x00,0x23,0xCD,0x72,0x64,0x7E };
    byte ip[] ={192,168,1,100};
    byte gateway[] ={192,168,1,1};
    byte subnet[] ={255,255,255,0};
    TEthernet net;


// telnet defaults to port 23
EthernetServer server(23);
boolean alreadyConnected = false; // whether or not the client was connected previously

void setup() {
// Open serial communications and wait for port to open:
  Serial.begin(9600);

  // initialize the ethernet device
  net.begin(mac, ip, gateway, subnet);
  // start listening for clients
  server.begin();


  Serial.print("Chat server address:");
  Serial.println(net.localIP());
}

void loop() {
  // wait for a new client:
  EthernetClient client = server.available();
  Serial.print("RUNING");
  // when the client sends the first byte, say hello:
  if (client) {
    if (!alreadyConnected) {
      // clead out the input buffer:
      client.flush();   
      Serial.println("We have a new client");
      client.println("Hello, client!");
      alreadyConnected = true;
    }

    if (client.available() > 0) {
      // read the bytes incoming from the client:
      char thisChar = client.read();
      // echo the bytes back to the client:
      server.write(thisChar);
      // echo the bytes to the server as well:
      Serial.write(thisChar);
    }
  }
}


我的这个程序很简单就是实现在本地通过IE浏览器看到IP地址。

我的板子通过网口接到路由器,MAC 为:00 23 CD72 64 7E
                                                        网关为:192.168.1.1
我对论坛里通过的网络部分,表示怀疑,因为我星期天搞了一天,络口指示灯一点不亮。我用了好几个程序,在不跳线的情况下。我看是没有办法的。学习吗就应知之为知之,不知为不知。我通过实践觉得网口有毛病。求解?


但我程序编译通过了。下进没任何反应。MAC,网关,IP,我都没设错。我怀疑板子的网络接口是不是有问题。

请做出的或知道原因的大侠给个指导。谢了


助工
2012-12-12 06:40:52     打赏
18楼
网络部分我再想想,先往下学习,今天我学习了随机发生器。
 randomSeed 给个随机数种子。
如果它们是相同的就按一定顺序给出随机随机数。
 randomSeed (unsigned int seed)
 random在规定的范围内,得到一个随机数。
 long random (long min_num, long max_num)
 程序如下: 
# include <rxduino.h>
# define INTERVAL 1000

void setup ()
{
    Serial.begin (9600);
    randomSeed (millis ());
}

void loop ()
{
    Serial.println (random (0, 100));
    delay (INTERVAL);
}

效果如下:


高工
2012-12-12 13:49:45     打赏
19楼
LZ进展很好啊!!顶个

专家
2012-12-12 15:08:30     打赏
20楼
很有条理性!

共26条 2/3 1 2 3 跳转至

回复

匿名不能发帖!请先 [ 登陆 注册 ]