
为了能让树莓派摆脱每次使用都要插网线的麻烦,我最终还是决定为它配备一块USB无线网卡。在Google了一番之后,我发现很多树莓派用户都提到基于Ralink RT5370芯片的USB无线网卡,于是我购买了一个基于RT5370芯片的腾达(Tenda)W311MI迷你无线USB网卡(如下图所示),非常便宜的白菜价:只要¥30。
To get rid of the inconveniency of connecting a network cable to Raspberry Pi I decided to equip it with a wireless USB adapter. After Googling the Internet I found that many Pi users mention the wireless USB adapter based on Ralink RT5370 chipset, so I bought one too - the Tenda W311MI 150Mbps Wireless Mini USB Adapter(shown as below), which based on RT5370 and has a very low price: only $4.8 .

关于如何在使用Arch Linux ARM系统的树莓派上使用RT5370芯片的USB无线网卡,网上很难找到完整的教程(用Debian系统的倒是有),所以我走了不少弯路,搞定了之后决定要写出来。所以,再次提醒你,如果你用的是Arch Linux ARM系统,并且使用的是RT5370芯片的USB无线网卡,那么阅读本文可能对你有所帮助;如果不是,那么就不用看下去了。
It's hard to find a detailed tutorial on how to use a RT5370-chipset-based wireless USB adapter on Raspberry Pi which runs the Arch Linux ARM os(but there are some good tutorials on Debian), so I wasted a lot of time in the setup process and when I figured it out I decided to write them down. So be sure again that if you are running the Arch Linux ARM on Pi and using a wireless USB adapter which based on RT5370 chipset, then you'll read something useful in this article, if not, don't waste your time and just close this webpage.
文章来源:http://www.codelast.com/
【1】关于驱动 / About the driver
插上USB无线网卡后,用如下命令查看一下:
After plugging the wireless USB adapter, use following command to have a check:
| 1 2 3 4 5 | [root@alarmpi ~]# lsusb Bus 001 Device 001: ID 1d6b:0002 Linux Foundation 2.0 root hub Bus 001 Device 002: ID 0424:9512 Standard Microsystems Corp. LAN9500 Ethernet 10/100Adapter Bus 001 Device 003: ID 0424:ec00 Standard Microsystems Corp. Bus 001 Device 004: ID 148f:5370 Ralink Technology, Corp. RT5370 Wireless Adapter |
So the Ralink RT5370 chipset has been recognized and this is the first step to success. 文章来源:http://www.codelast.com/ 然后我们还可以查看一下系统已经加载的模块:
Then we can check the modules which have been loaded by the OS:
| 01 02 03 04 05 06 07 08 09 10 11 12 13 | [root@alarmpi ~]# lsmod Module Size Used by rt2800usb 12977 0 rt2800lib 47334 1 rt2800usb rt2x00usb 10895 1 rt2800usb rt2x00lib 40765 3 rt2x00usb,rt2800lib,rt2800usb spidev 5028 0 mac80211 234117 3 rt2x00lib,rt2x00usb,rt2800lib cfg80211 173637 2 mac80211,rt2x00lib crc_ccitt 1433 1 rt2800lib spi_bcm2708 4357 0 i2c_bcm2708 3557 0 ipv6 289527 16 |
According to this article, the rt2x00 is the uniform driver for Ralink chipsets. 文章来源:http://www.codelast.com/ 【2】安装wireless_tools / Install wireless_tools
在配置过程中,我们要安装一个配置无线网络接口的工具——iwconfig。用如下命令安装:
First we need to install a wireless network interface configuration tool - iwconfig :
| 1 | [root@alarmpi ~]# pacman -S wireless_tools |
Then you can use iwconfig to check the info of your wireless USB adapter:
| 01 02 03 04 05 06 07 08 09 10 11 12 13 14 15 16 17 18 | [root@alarmpi ~]# iwconfig ifb0 no wireless extensions. lo no wireless extensions. wlan0 IEEE 802.11bgn ESSID:"XXX" Mode:Managed Frequency:2.412 GHz Access Point: XXXXXXXXXXX Bit Rate=54 Mb/s Tx-Power=20 dBm Retry long limit:7 RTS thr:off Fragment thr:off Encryption key:off Power Management:on Link Quality=70/70 Signal level=-39 dBm Rx invalid nwid:0 Rx invalid crypt:0 Rx invalid frag:0 Tx excessive retries:0 Invalid misc:18 Missed beacon:0 eth0 no wireless extensions. ifb1 no wireless extensions. |
The "wlan0" is what you should focus on. 文章来源:http://www.codelast.com/ 【3】配置无线连接的帐户 / Setup the WiFi account
我的无线网络是WPA加密的,要连接到这样的无线网络,需要使用wpa_supplicant工具。如果不出意外,你会发现Arch Linux ARM已经安装好了这个工具:
In order to connected to a WPA encrypted wireless network we need to use a tool like wpa_supplicant. No accident that you'll find it already been installed:
| 1 2 | [root@alarmpi ~]# pacman -Q | grep wpa wpa_supplicant 1.0-2 |
So we just use it. If you can't find the package, it's very easy to use pacman to install it. 为防止误操作,先备份wpa_supplicant的配置文件:
Backup the configuration file of wpa_supplicant to avoid misoperation:
| 1 | mv/etc/wpa_supplicant/wpa_supplicant.conf/etc/wpa_supplicant/wpa_supplicant.conf.bak |
Use wpa_passphrase tool to generate a very simple configuration file:
| 1 | wpa_passphrase myWirelessSSID myPassword >/etc/wpa_supplicant/wpa_supplicant.conf |
The "myWirelessSSID" is the SSID of your wireless network, "myPassword" is the password used to connect the network. wpa_passphrase tool will generate a very simple configuration file according to the info you provided and here we write the output to file /etc/wpa_supplicant/wpa_supplicant.conf.
启动网卡:
Bring wlan0 up:
| 1 | ifconfigwlan0 up |
Connect to the network:
| 1 | wpa_supplicant -B -Dwext -i wlan0 -c/etc/wpa_supplicant/wpa_supplicant.conf |
But we can't access Pi until it get an available IP address, use following command to get one:
| 01 02 03 04 05 06 07 08 09 10 | [root@alarmpi ~]# dhcpcd wlan0 dhcpcd[286]: version 5.6.2 starting dhcpcd[286]: wlan0: sending IPv6 Router Solicitation dhcpcd[286]: wlan0: broadcastingfora lease dhcpcd[286]: wlan0: offered 192.168.X.X from 192.168.X.X dhcpcd[286]: wlan0: acknowledged 192.168.X.X from 192.168.X.X dhcpcd[286]: wlan0: checkingfor192.168.X.X dhcpcd[286]: wlan0: sending IPv6 Router Solicitation dhcpcd[286]: wlan0: leased 192.168.16.10for86400 seconds dhcpcd[286]: forked to background, child pid 327 |
Now Pi should be able to connect the wireless network.
【4】开机自动连接无线网络 / Connect on system startup
为了能让树莓派开机自动连接无线网络,将如下两句shell命令添加到开机执行的列表中:
To let Pi connects the wireless network automatically, add the following 2 shell commands to OS startup execution list:
| 1 2 | wpa_supplicant -B -Dwext -i wlan0 -c/etc/wpa_supplicant/wpa_supplicant.conf dhcpcd wlan0 |
You can refer to this article, item 【2】 on how to execute shell command on startup.
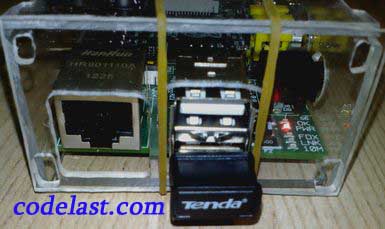
最后展示一下USB无线网卡在树莓派上的工作图(可见有线网卡工作状态指示灯没亮):
At last show you the wireless USB adapter working on Pi(it's obvious that the LNK status LED is off):
至此,本文的主要目的已经达到。
 我要赚赏金
我要赚赏金 STM32
STM32 MCU
MCU 通讯及无线技术
 物联网技术
物联网技术 电子DIY
电子DIY 板卡试用
板卡试用 基础知识
基础知识 软件与操作系统
 我爱生活
我爱生活 小e食堂
小e食堂

