
通过串口控制LED1状态
串口输入 ON LED1 点亮
串口输入 OFF LED1 熄灭
串口输入 其它 报错
1、驱动
串口驱动程序官方已经给出
代码路径:/kernel_smdkv210/drivers/serial/samsung.c
2、硬件
SIN210用户IO 扩展口,有1 路SPI 总线,1 路IIC 总线,两个五线串口,一个三线串口,1 路AD 输入,1 个PWM ,1 个中断,5V 电源和GND 方便用户各种应用扩展。
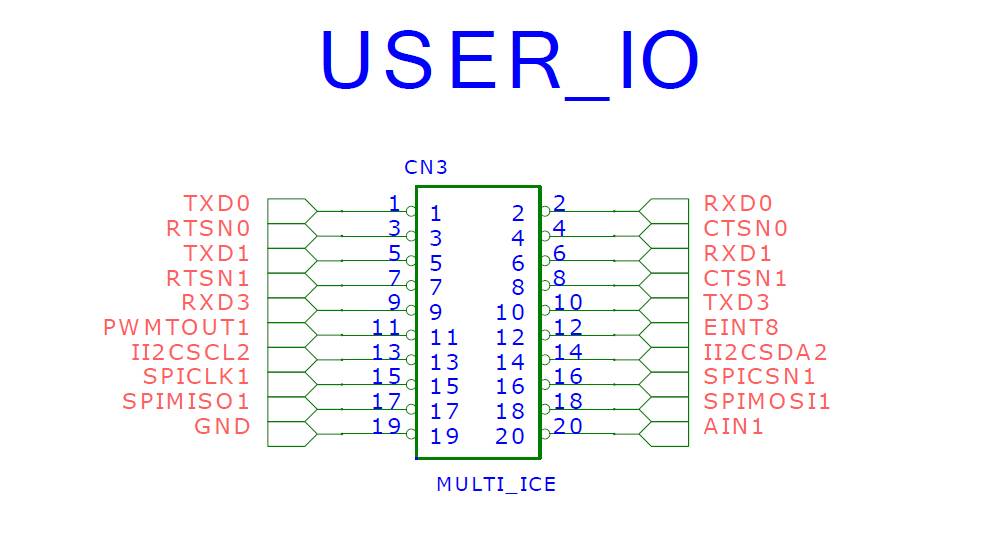
图19-1: User IO 原理图
开发板上USER_IO 带白色三角形标记的就是对应的 上图的一号引脚。
开发板中的com口连接的是TXD2和RXD3 用于系统调试,所以UserIO中没有这两个引脚,如下所以:

图19-2: COM 2 电路
笔者采用的是通过TXD0和RXD0来控制LED,用到了一个USB转TTL的电平转换模块:
将USB装TTL的 TXD、RXD、GND和开发板的TXD0、RXD0、GND相连接,如此硬件编连接好了。

图19-3-0: 连接
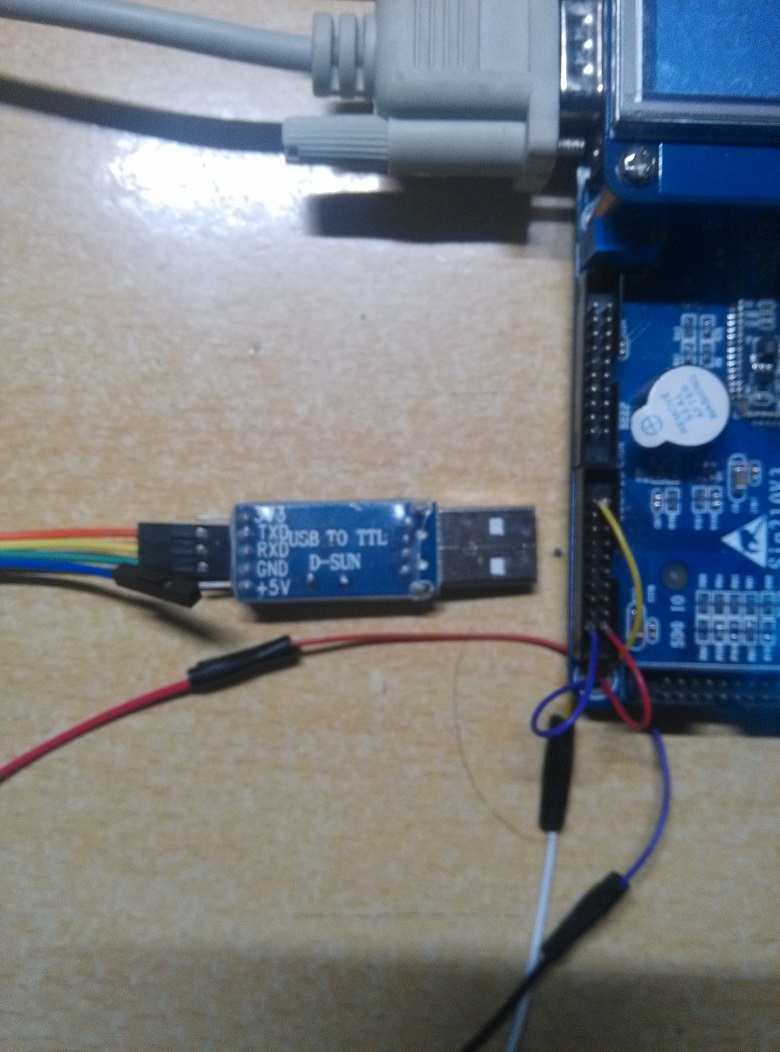
图19-3-1: 连接
3、应用
下面就是要编写应用程序了,结合以前的文章LED,串口配置校验位什么的,就不解释怎么用了,单片机里都有学过的,废话不说了,直接贴代码:
/**** USART0_LED.c  ****/
#include     <stdio.h>
#include     <stdlib.h>
#include     <unistd.h>
#include     <sys/types.h>
#include     <sys/stat.h>
#include     <fcntl.h>
#include     <termios.h>
#include     <errno.h>
#include     <sys/time.h>

#define LED1         0
#define LED2         1
#define LED3         2
#define LED4         3
#define LED_ON       0
#define LED_OFF      1

#define TRUE 1
#define FALSE -1

int speed_arr[] = {B115200, B38400, B19200, B9600, B4800, B2400, B1200, B300,
	    B38400, B19200, B9600, B4800, B2400, B1200, B300, };
int name_arr[] = {115200, 38400,  19200,  9600,  4800,  2400,  1200,  300,
	    38400,  19200,  9600, 4800, 2400, 1200,  300, };
void set_speed(int fd, int speed)
{
  int   i;
  int   status;
  struct termios   Opt;
  tcgetattr(fd, &Opt);

  for ( i= 0;  i < sizeof(speed_arr) / sizeof(int);  i++)
   {
   	if  (speed == name_arr[i])
   	{
   	    tcflush(fd, TCIOFLUSH);

    	cfsetispeed(&Opt, speed_arr[i]);
    	cfsetospeed(&Opt, speed_arr[i]);
    	status = tcsetattr(fd, TCSANOW, &Opt);
    	if  (status != 0)
            perror("tcsetattr fd1");
     	return;
     	}
   tcflush(fd,TCIOFLUSH);
   }

}

int set_Parity(int fd,int databits,int stopbits,int parity)
{
	struct termios options;
 if  ( tcgetattr( fd,&options)  !=  0)
  {
  	perror("SetupSerial 1");
  	return(FALSE);
  }
  options.c_cflag &= ~CSIZE;
  switch (databits)
  {
  	case 7:
  		options.c_cflag |= CS7;
  		break;
  	case 8:
		options.c_cflag |= CS8;
		break;
	default:
		fprintf(stderr,"Unsupported data size\n");
		return (FALSE);
	}
  switch (parity)
  	{
  	case 'n':
	case 'N':
		options.c_cflag &= ~PARENB;   /* Clear parity enable */
		options.c_iflag &= ~INPCK;     /* Enable parity checking */
		options.c_iflag &= ~(ICRNL|IGNCR);
		options.c_lflag &= ~(ICANON );
		break;
	case 'o':
	case 'O':
		options.c_cflag |= (PARODD | PARENB);
		options.c_iflag |= INPCK;             /* Disnable parity checking */
		break;
	case 'e':
	case 'E':
		options.c_cflag |= PARENB;     /* Enable parity */
		options.c_cflag &= ~PARODD;
		options.c_iflag |= INPCK;       /* Disnable parity checking */
		break;
	case 'S':
	case 's':  /*as no parity*/
		options.c_cflag &= ~PARENB;
		options.c_cflag &= ~CSTOPB;
		break;
	default:
		fprintf(stderr,"Unsupported parity\n");
		return (FALSE);
		}

  switch (stopbits)
  	{
  	case 1:
  		options.c_cflag &= ~CSTOPB;
		break;
	case 2:
		options.c_cflag |= CSTOPB;
		break;
	default:
		fprintf(stderr,"Unsupported stop bits\n");
		return (FALSE);
	}
  /* Set input parity option */
  if (parity != 'n')
  		options.c_iflag |= INPCK;
    options.c_cc[VTIME] = 150; // 15 seconds
    options.c_cc[VMIN] = 0;

  tcflush(fd,TCIFLUSH); /* Update the options and do it NOW */
  if (tcsetattr(fd,TCSANOW,&options) != 0)
  	{
  		perror("SetupSerial 3");
		return (FALSE);
	}
  return (TRUE);
 }

int OpenDev(char *Dev)
{
	int	fd = open( Dev, O_RDWR );         //| O_NOCTTY | O_NDELAY
	if (-1 == fd)
		{
			perror("Can't Open Serial Port");
			return -1;
		}
	else
	return fd;

}

int main(int argc, char **argv)
{
	int fd;
	int nread;
	char buffer[512];
	char *dev ="/dev/ttySAC0";
	int n=0,i=0;

        int fdled = -1;

       fdled = open("/dev/led",O_RDWR);
       if(fdled<0)
       {
         printf("Error:Can't open /dev/leds\n");
         return -1;
       }
       ioctl(fdled, LED_OFF, LED1);
       ioctl(fdled, LED_OFF, LED2);
       ioctl(fdled, LED_OFF, LED3);
       ioctl(fdled, LED_OFF, LED4);
	fd = OpenDev(dev);
	if (fd>0)
        set_speed(fd,115200);
	else
	    {
	      printf("Can't Open Serial Port!\n");
	      exit(0);
	    }
  	if (set_Parity(fd,8,1,'N')== FALSE)
  	{
    	printf("Set Parity Error\n");
    	exit(1);
  	}

	printf("\nWelcome to TTYtest\nHelloWii\n");
        write(fd,"helloworld\n!!!!\n",12);
  	while(1)
  	{

		nread = read(fd,&buffer[n],1);
		n++;
	   	if (buffer[n-1] == '\r')
	   	{
			printf("\n-------------\n");
			if((buffer[0]=='O')&&(buffer[1]=='N'))
			   {
			     write(fd, "\nLED 1 is Open\n", 15);
			     printf("LED 1 Is Open");
                             ioctl(fdled, LED_ON, LED1);

			   }
                        else if((buffer[0]=='O')&&(buffer[1]=='F')&&(buffer[2]=='F'))
			   {
			     write(fd, "\nLED 1 is Close\n", 16);
			     printf("LED 1 Is Close");
                             ioctl(fdled, LED_OFF, LED1);
			   }
			else
			   {
			      write(fd, "\nWRONG INFORMATION\n\n", 21);
			      printf("WRONG INFORMATION\n");

			   }
			printf("\n*************\n\n");n=0;
		}

    }
}
# General Makefile
Exec := USART0_LED
Obj := USART0_LED.c
CC := arm-linux-gcc

$(Exec) : $(Obj)
	$(CC) -o $@ $(Obj) $(LDLIBS$(LDLIBS-$(@)))

clean:
	rm -vf $(Exec) *.elf *.o
4、运行
编辑生成可执行文件,到开发板上,运行,我在Ubuntu系统中使用的minicom,配置好波特率即可
(注:下图左侧是 com2调试串口,有测试USART0控制串口)
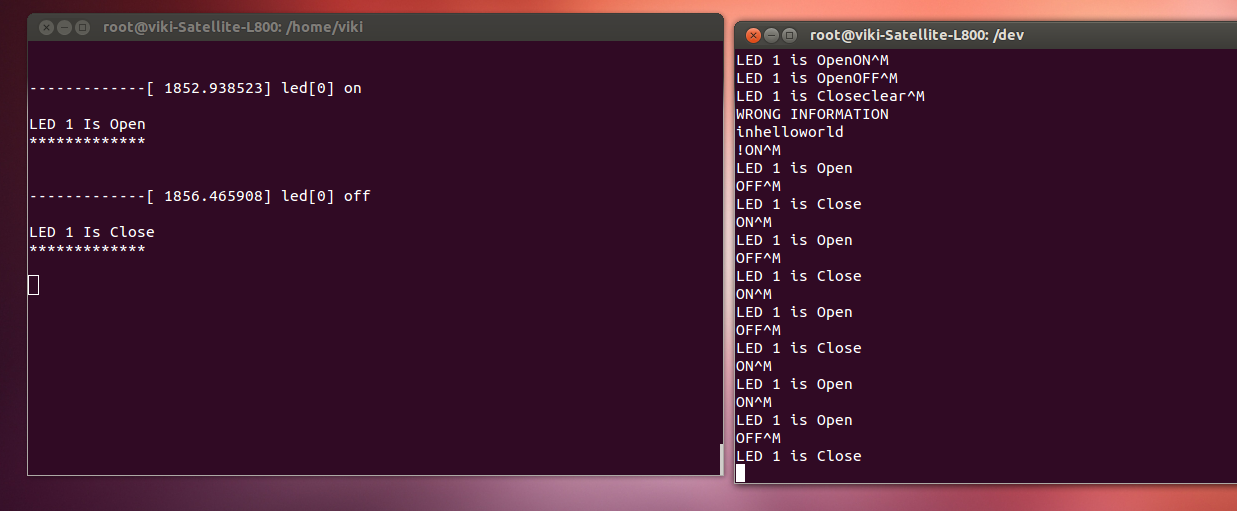
图19-4: 串口效果

图19-5: 串口效果
 我要赚赏金
我要赚赏金 STM32
STM32 MCU
MCU 通讯及无线技术
 物联网技术
物联网技术 电子DIY
电子DIY 板卡试用
板卡试用 基础知识
基础知识 软件与操作系统
 我爱生活
我爱生活 小e食堂
小e食堂

