今天就进入最后一步,写代码。
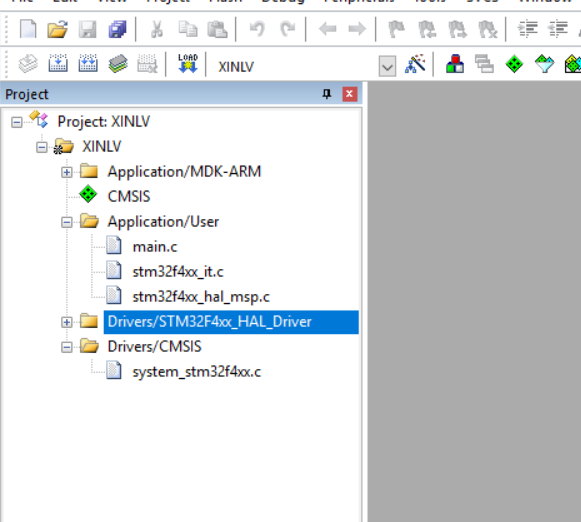
首先打开之前生成的工程文件。(代码有专门视频讲解——讲解如何搭建“跳动的心”所需要的开发环境以及其中的细节配置)完善“跳动的心”程序视频

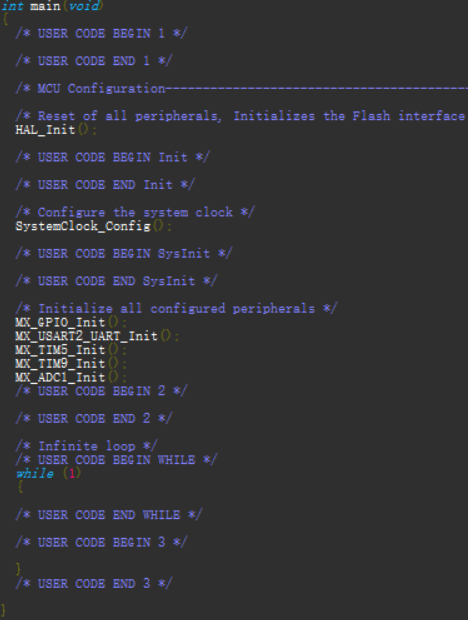
打开main.c文件


可以看到之前配置过的在这里边自动生成,找到刚才的定时器TIM5初始化函数。
static void MX_TIM5_Init(void)
{
TIM_ClockConfigTypeDef sClockSourceConfig;
TIM_MasterConfigTypeDef sMasterConfig;
TIM_OC_InitTypeDef sConfigOC;
htim5.Instance = TIM5;
htim5.Init.Prescaler = 0;
htim5.Init.CounterMode = TIM_COUNTERMODE_UP;
htim5.Init.Period = 0;
htim5.Init.ClockDivision = TIM_CLOCKDIVISION_DIV1;
if (HAL_TIM_Base_Init(&htim5) != HAL_OK)
{
_Error_Handler(__FILE__, __LINE__);
}
sClockSourceConfig.ClockSource = TIM_CLOCKSOURCE_INTERNAL;
if (HAL_TIM_ConfigClockSource(&htim5, &sClockSourceConfig) != HAL_OK)
{
_Error_Handler(__FILE__, __LINE__);
}
if (HAL_TIM_PWM_Init(&htim5) != HAL_OK)
{
_Error_Handler(__FILE__, __LINE__);
}
sMasterConfig.MasterOutputTrigger = TIM_TRGO_RESET;
sMasterConfig.MasterSlaveMode = TIM_MASTERSLAVEMODE_DISABLE;
if (HAL_TIMEx_MasterConfigSynchronization(&htim5, &sMasterConfig) != HAL_OK)
{
_Error_Handler(__FILE__, __LINE__);
}
sConfigOC.OCMode = TIM_OCMODE_PWM1;
sConfigOC.Pulse = 0;
sConfigOC.OCPolarity = TIM_OCPOLARITY_HIGH;
sConfigOC.OCFastMode = TIM_OCFAST_DISABLE;
if (HAL_TIM_PWM_ConfigChannel(&htim5, &sConfigOC, TIM_CHANNEL_1) != HAL_OK)
{
_Error_Handler(__FILE__, __LINE__);
}
HAL_TIM_MspPostInit(&htim5);
}
设置Pulse的值可以修改脉宽。这里在main.c文件中添加一个用户PWM设置函数,函数的参数为修改的值。
void user_pwm_setvalue(uint16_t value)
{
TIM_OC_InitTypeDef sConfigOC;
sConfigOC.OCMode = TIM_OCMODE_PWM1;
sConfigOC.Pulse = value;
sConfigOC.OCPolarity = TIM_OCPOLARITY_HIGH;
sConfigOC.OCFastMode = TIM_OCFAST_DISABLE;
HAL_TIM_PWM_ConfigChannel(&htim5, &sConfigOC, TIM_CHANNEL_1);
HAL_TIM_PWM_Start(&htim5, TIM_CHANNEL_1);
}
然后在main.c文件中添加心率传感器的驱动程序
下面是驱动定义的变量
// these variables are volatile because they are used during the interrupt service routine!
#define true 1
#define false 0
int BPM; // used to hold the pulse rate
int Signal; // holds the incoming raw data
int IBI = 600; // holds the time between beats, must be seeded!
unsigned char Pulse = false; // true when pulse wave is high, false when it's low
unsigned char QS = false; // becomes true when Arduoino finds a beat.
int rate[10]; // array to hold last ten IBI values
unsigned long sampleCounter = 0; // used to determine pulse timing
unsigned long lastBeatTime = 0; // used to find IBI
int P =512; // used to find peak in pulse wave, seeded
int T = 512; // used to find trough in pulse wave, seeded
int thresh = 512; // used to find instant moment of heart beat, seeded
int amp = 100; // used to hold amplitude of pulse waveform, seeded
int Num;
unsigned char firstBeat = true; // used to seed rate array so we startup with reasonableBPM
unsigned char secondBeat = false; // used to seed rate array so we startup with reasonableBPM
然后是驱动程序
void HAL_TIM_PeriodElapsedCallback(TIM_HandleTypeDef *htim)
{
unsigned int runningTotal;
if(htim->Instance==htim9.Instance)
{
Signal=HAL_ADC_GetValue(&hadc1); // read the Pulse Senso
sampleCounter += 2; // keep track of the time in mS with this variable
Num = sampleCounter - lastBeatTime; // monitor the time since the last beat to avoid noise
HAL_ADC_Start(&hadc1); //restart ADC conversion
// find the peak and trough of the pulse wave
if(Signal < thresh && Num > (IBI/5)*3){ // avoid dichrotic noise by waiting 3/5 of last IBI
if (Signal < T){ // T is the trough
T = Signal; // keep track of lowest point in pulse wave
}
}
if(Signal > thresh && Signal > P){ // thresh condition helps avoid noise
P = Signal; // P is the peak
} // keep track of highest point in pulse wave
// NOW IT'S TIME TO LOOK FOR THE HEART BEAT
// signal surges up in value every time there is a pulse
if (Num > 250){ // avoid high frequency noise
if ( (Signal > thresh) && (Pulse == false) && (Num > (IBI/5)*3) ){
Pulse = true; // set the Pulse flag when we think there is a pulse
HAL_GPIO_WritePin(GPIOA,GPIO_PIN_5,GPIO_PIN_SET); // turn on pin 13 LED
IBI = sampleCounter - lastBeatTime; // measure time between beats in mS
lastBeatTime = sampleCounter; // keep track of time for next pulse
if(secondBeat){ // if this is the second beat, if secondBeat == TRUE
secondBeat = false; // clear secondBeat flag
for(int i=0; i<=9; i++){ // seed the running total to get a realisitic BPM at startup
rate[i] = IBI;
}
}
if(firstBeat){ // if it's the first time we found a beat, if firstBeat == TRUE
firstBeat = false; // clear firstBeat flag
secondBeat = true; // set the second beat flag
// sei(); // enable interrupts again
return; // IBI value is unreliable so discard it
}
// keep a running total of the last 10 IBI values
runningTotal = 0; // clear the runningTotal variable
for(int i=0; i<=8; i++){ // shift data in the rate array
rate[i] = rate[i+1]; // and drop the oldest IBI value
runningTotal += rate[i]; // add up the 9 oldest IBI values
}
rate[9] = IBI; // add the latest IBI to the rate array
runningTotal += rate[9]; // add the latest IBI to runningTotal
runningTotal /= 10; // average the last 10 IBI values
BPM = 60000/runningTotal; // how many beats can fit into a minute? that's BPM!
QS = true; // set Quantified Self flag
// QS FLAG IS NOT CLEARED INSIDE THIS ISR
}
}
if (Signal < thresh && Pulse == true){ // when the values are going down, the beat is over
HAL_GPIO_WritePin(GPIOA,GPIO_PIN_5,GPIO_PIN_RESET); // turn off pin 13 LED
Pulse = false; // reset the Pulse flag so we can do it again
amp = P - T; // get amplitude of the pulse wave
thresh = amp/2 + T; // set thresh at 50% of the amplitude
P = thresh; // reset these for next time
T = thresh;
}
if (Num > 2500){ // if 2.5 seconds go by without a beat
thresh = 512; // set thresh default
P = 512; // set P default
T = 512; // set T default
lastBeatTime = sampleCounter; // bring the lastBeatTime up to date
firstBeat = true; // set these to avoid noise
secondBeat = false; // when we get the heartbeat back
}
}
}
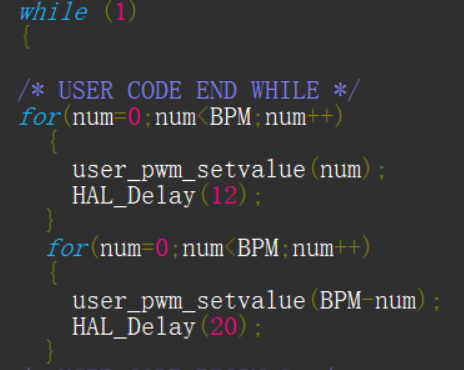
最后在主函数中,添加代码

(快去看楼主小哥哥嗓子发炎依旧坚持录制的配套视频)
大家也可以在自己制作的过程中,通过改变延时函数和变量的大小来达到不同的效果,楼主在配置过程中可是尝试了很多不同的变量大小,呈现了很多不同的效果,也从中得到了很多有趣的东西,至于是哪些有趣的东西,等各位萌新自己制作出来,自己要记得调试哦,欢迎在下面留言发表你看到的不同的效果和你认为的有趣的东西。最棒的那位萌新,你的建议会帮助到许许多多的人的~~~也欢迎留言分享在制作过程中遇到的困难和心得~~

 我要赚赏金
我要赚赏金

