前言
英特尔公司发行的模型部署工具 OpenVINO™ 模型部署套件,可以实现在不同系统环境下运行,且发布的 OpenVINO™ 2023 最新版目前已经支持 MacOS 系统并同时支持在苹果 M 系列芯片上部署模型。在该项目中,我们将向大家展示如何在 MacOS 系统、M2芯片的 Macbook Air 电脑上,展示使用 OpenVINO™ C++ API 部署深度学习模型。
1. OpenVINO™
英特尔发行版 OpenVINO™ 工具套件基于 oneAPI 而开发,可以加快高性能计算机视觉和深度学习视觉应用开发速度工具套件,适用于从边缘到云的各种英特尔平台上,帮助用户更快地将更准确地真实世界结果部署到生产系统中。通过简化的开发工作流程,OpenVINO™ 可赋能开发者在现实世界中部署高性能应用程序和算法。
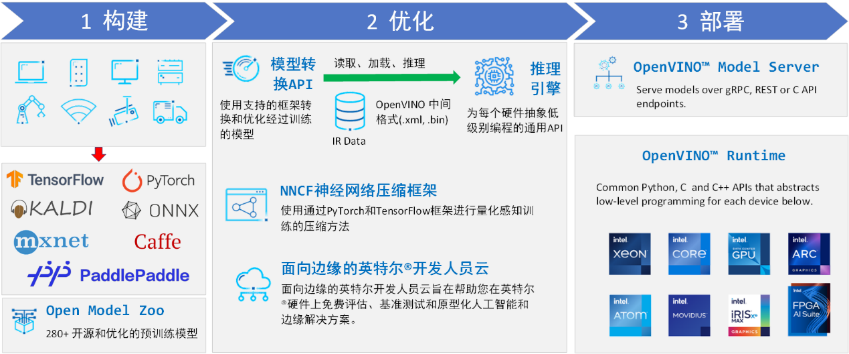
OpenVINO™ 2023.2 于 2023 年 11 月 16 日发布,该工具包带来了挖掘生成人工智能全部潜力的新功能。更多的生成式 AI 覆盖和框架集成,以最大限度地减少代码更改,并且扩展了对直接 PyTorch 模型转换的模型支持。支持更多新的模型,包括 LLaVA、chatGLM、Bark 和 LCM 等著名模型。支持更广泛的大型语言模型(LLM)和更多模型压缩技术,支持运行时推理支持以下 Int4 模型压缩格式,通过神经网络压缩框架(NNCF) 进行本机 Int4 压缩等一系列新的功能。
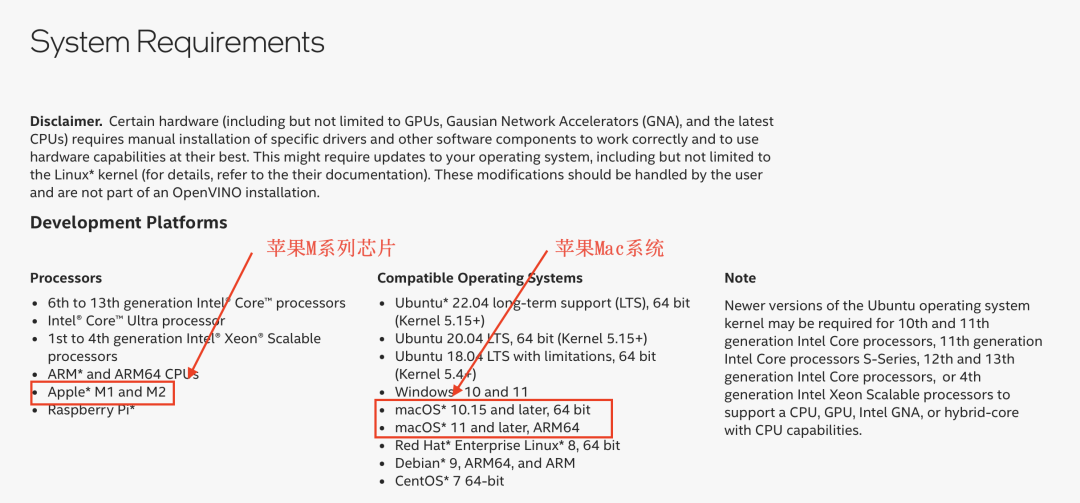
通过 OpenVINO™ 官网信息,我们可以看出,目前 OpenVINO™已经能够在苹果 MacOS 系统、M 系列芯片上运行,这为使用 MacOS 系统的开发者提供了很好的工具。因此在此处,我们将在 MacOS 系统、M2芯片的 Macbook Air 电脑上,展示使用 OpenVINO™ C++ API 部署深度学习模型的详细流程。
2. OpenVINO™ 下载
官方在发布版本中已经提供 MacOS 系统的编译库,因此在此处我们只需要下载官方编译库即可。
首先访问 OpenVINO™ 网站,依次选择版本号、操作系统、安装方式等内容,然后点击下载,如下图所示:
OpenVINO™ 官网:https://www.intel.com/content/www/us/en/developer/tools/openvino-toolkit/download.html
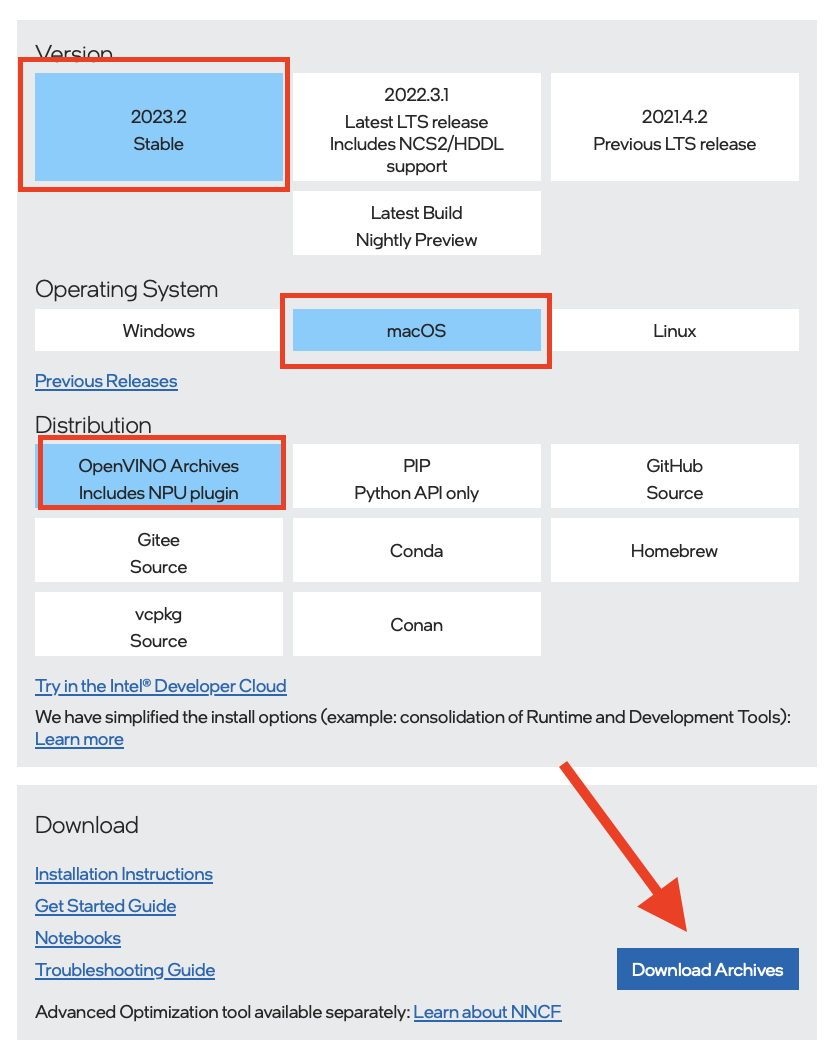
下面是官方编译的文件,此处主要提供了两个版本,一个是适用于苹果电脑之前的版本,主要是 MacOS 10 以及之前的版本系统并且使用的是 Intel CPU,另一个是使用了苹果的 M 系列芯片的新版本电脑,主要是 MacOS 11 之后的系统。大家可以根据自己的电脑进行选择:

下载完后,将该文件解压到任意文件夹,在此处为了方便后续使用一集更新,将其解压到用户文件夹,如下图所示:
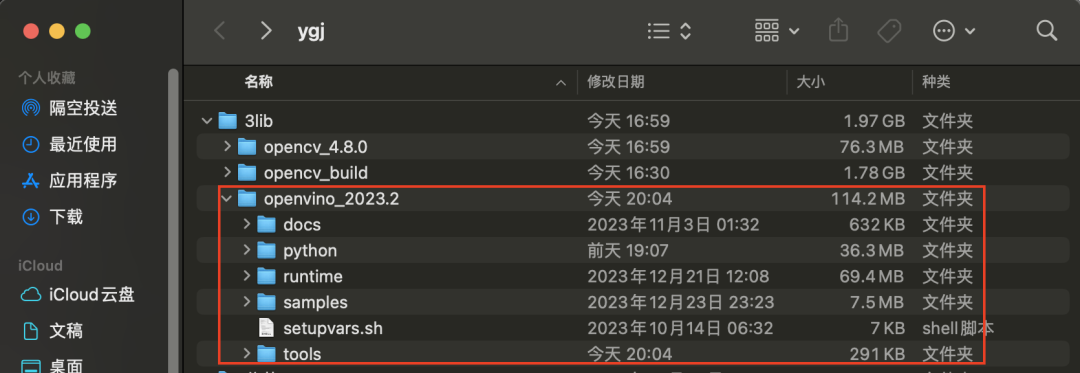
后续我们会使用 CMake 进行项目编译,因此我们此处无需再做其他的设置。
其他环境配置:
● MacOS:14.2.1
● CMake:3.28
● Make:3.81
● 编译软件:Visual Studio Code
● OpenCV:4.8.0 其他环境配置此处不做过多赘述,OpenCV 环境安装可以参考下述文章实现:【OpenCV】在 MacOS 上源码编译 OpenCV
3. 代码实现
此处我们以 Yolov8图片分类模型为例进行项目测试,由于该模型之前我们已经多次使用,所以在此处不再做耕作的阐述,具体代码如下所示:
#include <iostream>
#include <string>
#include <vector>
#include <algorithm>
#include <sys/time.h>
#include "openvino/openvino.hpp" //openvino header file
#include "opencv2/opencv.hpp"    //opencv header file

int main(int argc, char* argv[])
{
    ov::Version version = ov::get_openvino_version();
    std::cout << version.description << ": " << version.buildNumber << std::endl;

    // -------- Step 1. Initialize OpenVINO Runtime Core --------
    ov::Core core;

    // -------- Step 2. Compile the Model --------
    auto compiled_model = core.compile_model("yolov8s-cls.xml", "CPU");

    // -------- Step 3. Create an Inference Request --------
    ov::InferRequest infer_request = compiled_model.create_infer_request();

    // -------- Step 4.Read a picture file and do the preprocess --------
    cv::Mat img = cv::imread("image.jpg");
    // Preprocess the image
    int col = img.cols;
    int row = img.rows;
    int _max = MAX(col, row);
    cv::Mat letterbox_img = cv::Mat::zeros(_max, _max, CV_8UC3);
    img.copyTo(letterbox_img(cv::Rect(0, 0, col, row)));

    cv::Mat blob = cv::dnn::blobFromImage(letterbox_img, 1.0 / 255.0, cv::Size(224, 224), cv::Scalar(), true);

    // -------- Step 5. Feed the blob into the input node of the Model -------
    // Get input port for model with one input
    auto input_port = compiled_model.input();
    std::cout << "The shape of input tensor:" << input_port.get_shape() << std::endl;
    // Create tensor from external memory
    ov::Tensor input_tensor(input_port.get_element_type(), input_port.get_shape(), blob.ptr(0));
    // Set input tensor for model with one input
    infer_request.set_input_tensor(input_tensor);

    // -------- Step 6. Start inference --------
    infer_request.infer();
    struct timeval start_time, end_time;
    gettimeofday(&start_time,NULL);
    infer_request.infer();
    gettimeofday(&end_time,NULL);
    // Get the elapsed millisecond time
    double elapsed_time = (end_time.tv_sec - start_time.tv_sec)*1000 + (end_time.tv_usec - start_time.tv_usec)/1000;
    // -------- Step 7. Get the inference result --------
    auto output = infer_request.get_output_tensor(0);
    auto output_shape = output.get_shape();
    std::cout << "The shape of output tensor:" << output_shape << std::endl;

    // -------- Step 8. Postprocess the result --------
    float* output_buffer = output.data<float>();
    std::vector<float> result(output_buffer, output_buffer + output_shape[1]);
    auto max_idx = std::max_element(result.begin(), result.end());
    int class_id = max_idx - result.begin();
    float score = *max_idx;
    std::cout << "Class ID:" << class_id << " Score:" <<score<< std::endl;
    std::cout << "infer time:" <<elapsed_time<< std::endl;
    return 0;
}
在该代码中,主要是获取 OpenVINO™ 版本信息,然后按照模型部署流程部署测试了 Yolov8 图片分类模型,并打印输出结果以及推理时间。
4. 项目编译运行
在该项目中通过 CMake 编译项目,定义的 CMakeLists.txt 文件如下所示:
cmake_minimum_required(VERSION 3.28)
project(test_openvino)
set(OpenCV_DIR /Users/ygj/3lib/opencv_4.8.0/lib/cmake/opencv4)
find_package(OpenCV REQUIRED)
message(STATUS "OpenCV_DIR = ${OpenCV_DIR}")
message(STATUS "OpenCV_INCLUDE_DIRS = ${OpenCV_INCLUDE_DIRS}")
message(STATUS "OpenCV_LIBS = ${OpenCV_LIBS}")
set(OpenVINO_DIR /Users/ygj/3lib/openvino_2023.2/runtime/cmake)
set(OpenVINO_LIBs "/Users/ygj/3lib/openvino_2023.2/runtime/lib/arm64/Release/libopenvino.2320.dylib")
set(CMAKE_CXX_FLAGS "${CMAKE_CXX_FLAGS} -std=c++11")
include_directories(
  /Users/ygj/3lib/openvino_2023.2/runtime/include
   ${OpenCV_INCLUDE_DIRS}
)
add_executable(test_openvino test_openvino.cpp )
target_link_libraries(test_openvino ${OpenVINO_LIBs} ${OpenCV_LIBS})
在这个 CMakeLists 文件中,需要同时配置 OpenCV 以及 OpenVINO™ 这两个依赖库,具体编译以及配置方式参考 CMake 手册。
接下来就可以项目编译了,在终端中输入一下命令,就可以进行项目配置了,输出结果如下所示:
cmake .

接下来就是进行项目编译,CMake 编译后会生成 Makefile 文件,之后就可以运行 make 命令进行项目最后的编译,然后就可以直接运行生成的项目文件,如下所示:
make
./test_openvino
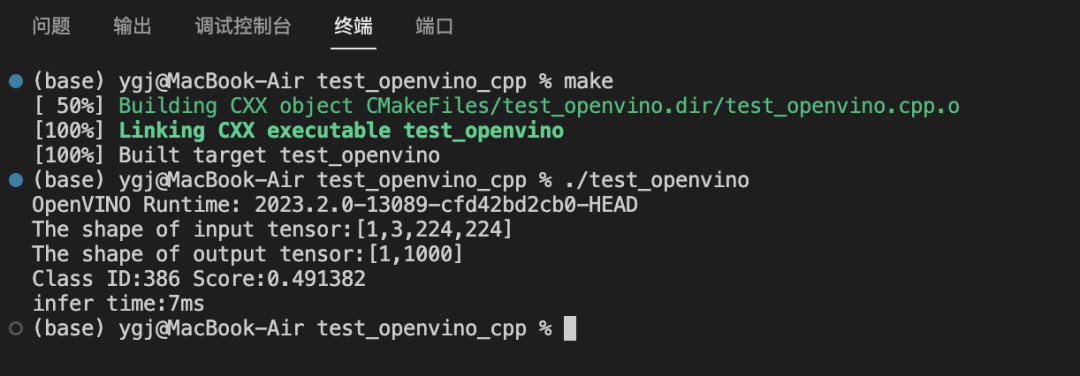
上图中展示了项目最后运行结果,可以看出,此处使用的模型输入大小为[1,3,224,224],输出大小为[1,1000],识别结果 Class ID=386,查看分类结果字典,图片识别结果与图片一致;模型的推理时间为:7ms。
5. 总结
该项目中,我们在 MacOS 14.2.1 系统、M2 芯片的 Macbook Air 电脑上,成功使用 OpenVINO™ C++ API 部署了 Yolov8 图片分类深度学习模型,并详细演示了 OpenVINO™ C++ API 在苹果电脑上使用与配置流程,为使用 MacOS 系统的开发者提供了很好的范例与参考。
作者:英特尔边缘计算创新大使 颜国进

 我要赚赏金
我要赚赏金

