
教学视频里面是通过cpy 进行驱动编写及测试的,由于固件不支持ble,所以放弃了,转使用arduino+platformio进行开发
https://circuitpython.org/board/adafruit_feather_esp32s3_tft/
https://learn.adafruit.com/adafruit-esp32-s3-tft-feather/circuitpython
双击rst 进入刷入uf2文件模式
将上面下载的固件拖入即可 这里留作备用
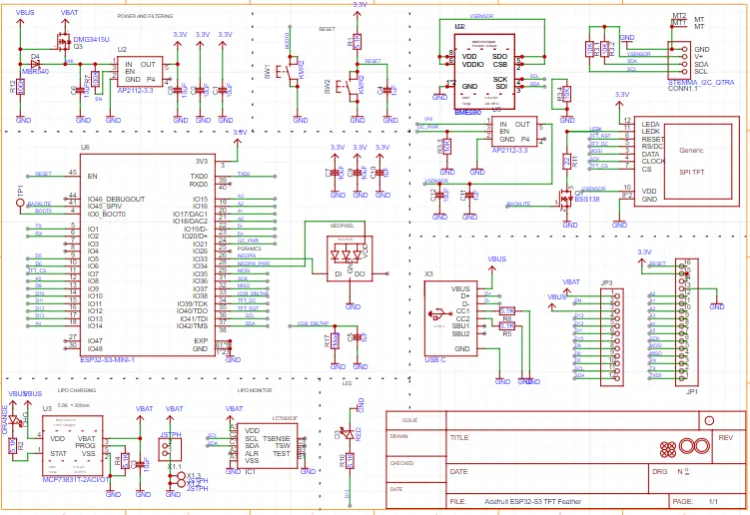
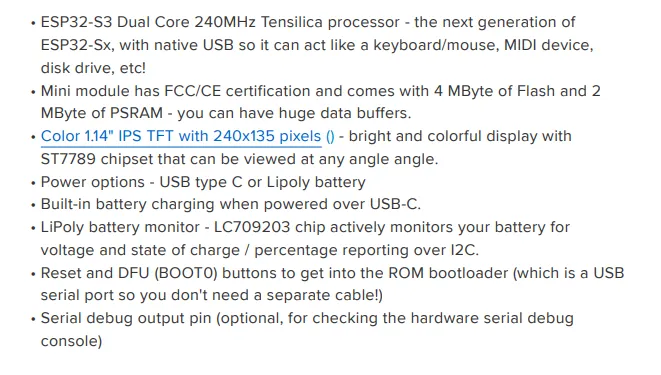
硬件相关资料硬件相关信息可以通过 https://github.com/adafruit/Adafruit-ESP32-S3-TFT-Feather-PCB 进行查看,主控使用的esp32s3 4M flash 2M psram
原理图
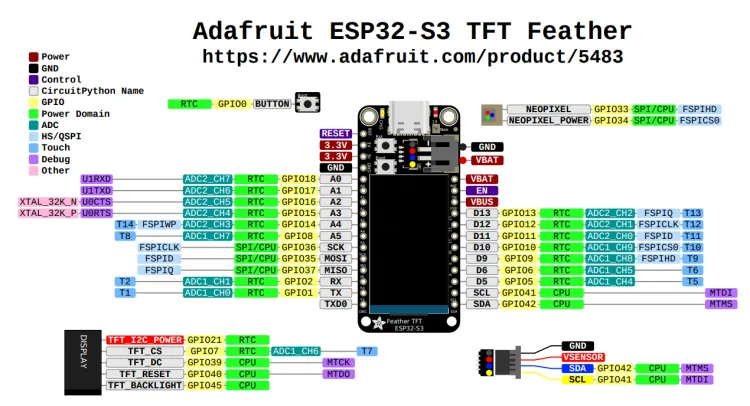
板载信息
软件开发及调试屏幕适配
采用tft_espi 库进行驱动
1.修改管脚,根据原理图进行修改user_setup.h
#define TFT_MISO  37  // Automatically assigned with ESP8266 if not defined
#define TFT_MOSI  35  // Automatically assigned with ESP8266 if not defined
#define TFT_SCLK  36  // Automatically assigned with ESP8266 if not defined

#define TFT_CS    7  // Chip select control pin D8
#define TFT_DC    39  // Data Command control pin
#define TFT_RST   40  // Reset pin (could connect to NodeMCU RST, see next line)
//#define TFT_RST  -1     // Set TFT_RST to -1 if the display RESET is connected to NodeMCU RST or 3.3V


#define TFT_BL 45  // LED back-light (only for ST7789 with backlight control pin)
使能驱动

驱动模式

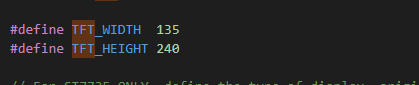
设置 长宽
简单的点灯加量屏
#include <Arduino.h>
#include <Wire.h>
#include <TFT_eSPI.h>  // 引入 TFT_eSPI 库

TFT_eSPI tft;  // 创建 TFT_eSPI 对象

void setup()
{
  // initialize LED digital pin as an output.
  pinMode(LED_BUILTIN, OUTPUT);

  tft.init();  // 初始化 TFT 屏幕
  tft.setRotation(1);           // 调整屏幕方向,根据需要选择合适的值(0、1、2、3)
  tft.fillScreen(TFT_BLACK);    // 设置屏幕背景颜色为黑色
  tft.setTextSize(2);           // 设置文本大小
  tft.setTextColor(TFT_YELLOW);  // 设置文本颜色为白色

}

void loop()
{

    tft.fillScreen(TFT_BLACK);  // 清空屏幕,将屏幕填充为黑色
    tft.setCursor(0, 10);            // 设置文本光标位置,参数:x 坐标,y 坐标
    tft.println("Hello EEPW,I am Chris!");  // 打印文本,参数:文本内容
    // turn the LED on (HIGH is the voltage level)
    digitalWrite(LED_BUILTIN, HIGH);
    // wait for a second
    delay(1000);
    // turn the LED off by making the voltage LOW
    digitalWrite(LED_BUILTIN, LOW);
    // wait for a second
    delay(1000);
}蓝牙驱动首先参考蓝牙例程,添加相关头函数
#include <BLEDevice.h>
#include <BLEServer.h>
#include <BLEUtils.h>
#include <BLE2902.h>
指定BLE uuid 及相关变量
BLEServer *pServer = NULL;
BLECharacteristic * pTxCharacteristic;
bool deviceConnected = false;
bool oldDeviceConnected = false;
uint8_t txValue = 0;

// See the following for generating UUIDs:
// https://www.uuidgenerator.net/

#define SERVICE_UUID           "6E400001-B5A3-F393-E0A9-E50E24DCCA9E" // UART service UUID
#define CHARACTERISTIC_UUID_RX "6E400002-B5A3-F393-E0A9-E50E24DCCA9E"
#define CHARACTERISTIC_UUID_TX "6E400003-B5A3-F393-E0A9-E50E24DCCA9E"
设定接收callback ,收到蓝牙消息是进行舵机控制,server的callback 用于实时检测ble 是否有断开和连接
class MyServerCallbacks: public BLEServerCallbacks {
    void onConnect(BLEServer* pServer) {
      deviceConnected = true;
    };

    void onDisconnect(BLEServer* pServer) {
      deviceConnected = false;
    }
};

class MyCallbacks: public BLECharacteristicCallbacks {
    void onWrite(BLECharacteristic *pCharacteristic) {
      std::string rxValue = pCharacteristic->getValue();

      if (rxValue.length() > 0) {
        Serial0.println("*********");
        Serial0.print("Received Value: ");
        for (int i = 0; i < rxValue.length(); i++)
          Serial0.print(rxValue[i]);
        servo_control();

        Serial0.println();
        Serial0.println("*********");
      }
    }
};
在setup中进行初始化,指定名称,创建相关server 并进行初始化及启动
  // Create the BLE Device
  BLEDevice::init("UART Service");

  // Create the BLE Server
  pServer = BLEDevice::createServer();
  pServer->setCallbacks(new MyServerCallbacks());

  // Create the BLE Service
  BLEService *pService = pServer->createService(SERVICE_UUID);

  // Create a BLE Characteristic
  pTxCharacteristic = pService->createCharacteristic(
										CHARACTERISTIC_UUID_TX,
										BLECharacteristic::PROPERTY_NOTIFY
									);

  pTxCharacteristic->addDescriptor(new BLE2902());

  BLECharacteristic * pRxCharacteristic = pService->createCharacteristic(
											 CHARACTERISTIC_UUID_RX,
											BLECharacteristic::PROPERTY_WRITE
										);

  pRxCharacteristic->setCallbacks(new MyCallbacks());

  // Start the service
  pService->start();

  // Start advertising
  pServer->getAdvertising()->start();
  Serial.println("Waiting a client connection to notify...");
在主循环中进行连接性判断,如果连接 则进行光lux 信息,传给上位机
    if (deviceConnected) {

        pTxCharacteristic->setValue(light_lux);
        pTxCharacteristic->notify();
		delay(10); // bluetooth stack will go into congestion, if too many packets are sent
	}

    // disconnecting
    if (!deviceConnected && oldDeviceConnected) {
        delay(500); // give the bluetooth stack the chance to get things ready
        pServer->startAdvertising(); // restart advertising
        Serial.println("start advertising");
        oldDeviceConnected = deviceConnected;
    }
    // connecting
    if (deviceConnected && !oldDeviceConnected) {
		// do stuff here on connecting
        oldDeviceConnected = deviceConnected;
}BH1750光传感器这里采用的是claws/BH1750@^1.3.0 库函数
调用过程如下:
首先调用头函数,声明变量
#include <BH1750.h>
#include <Wire.h>
BH1750 lightMeter;
然后在setup中进行初始化模式,这里库依赖wire 库,需要指定iic 使用的引脚,我板卡连接的是42 41
  Wire.setPins(42,41);
  Wire.begin();
  lightMeter.begin(BH1750::ONE_TIME_HIGH_RES_MODE);
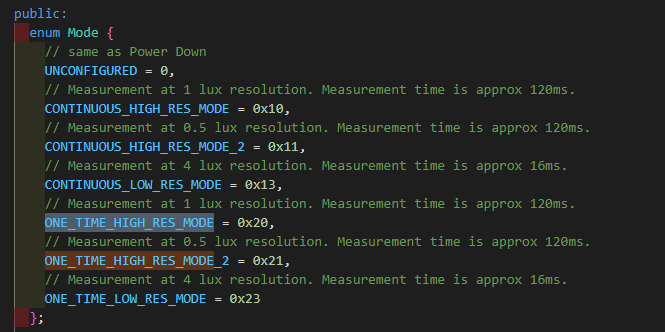
一共支持 6种模式,主要进行针对不同的亮度场景调整精度及测量时间
然后在主循环种检测测量是否完成,完成后,将转换的结果输出给全局变量,然后可以通过全局变量,同步给蓝牙上位机及屏幕
    if (lightMeter.measurementReady(true)) {
        float lux = lightMeter.readLightLevel();
        Serial0.print(F("Light: "));
        Serial0.print(lux);
        Serial0.println(F(" lx"));
        lightMeter.configure(BH1750::ONE_TIME_HIGH_RES_MODE);
        if (lux < 0) {
            Serial0.println(F("Error condition detected"));
        }
        else
        {
            light_lux= (int)lux;
        }
}屏幕菜单驱动屏幕菜单这里调用的是arduinoMenu 库,此库依赖自家的streamflow ,两个库都需求进行安装
neu-rah/ArduinoMenu library @ ^4.21.5
neu-rah/streamFlow @ 0.0.0-alpha+sha.bf16ce8926
首先引用头函数
#include <menu.h>
#include <menuIO/TFT_eSPIOut.h>
#include <menuIO/serialIO.h>
进行一些颜色定义,屏幕信息定义,用于后续创建服务及菜单使用
using namespace Menu;

#define Black RGB565(0,0,0)
#define Red	RGB565(255,0,0)
#define Green RGB565(0,255,0)
#define Blue RGB565(0,0,255)
#define Gray RGB565(128,128,128)
#define LighterRed RGB565(255,150,150)
#define LighterGreen RGB565(150,255,150)
#define LighterBlue RGB565(150,150,255)
#define DarkerRed RGB565(150,0,0)
#define DarkerGreen RGB565(0,150,0)
#define DarkerBlue RGB565(0,0,150)
#define Cyan RGB565(0,255,255)
#define Magenta RGB565(255,0,255)
#define Yellow RGB565(255,255,0)
#define White RGB565(255,255,255)

#define MAX_DEPTH 2
#define GFX_WIDTH 240
#define GFX_HEIGHT 135
#define fontW 10
#define fontH 16
serialIn serial(Serial0);
idx_t serialTops[MAX_DEPTH]={0};
serialOut outSerial(Serial0,serialTops);
TFT_eSPI tft;  // 创建 TFT_eSPI 对象
const colorDef<uint16_t> display_colors[6] MEMMODE = {
//{{disabled normal,disabled selected},{enabled normal,enabled selected, enabled editing}}
{{(uint16_t)Black, (uint16_t)Black}, {(uint16_t)Black, (uint16_t)Red, (uint16_t)Red}}, //bgColor
{{(uint16_t)White, (uint16_t)White}, {(uint16_t)White, (uint16_t)White, (uint16_t)White}},//fgColor
{{(uint16_t)Red, (uint16_t)Red}, {(uint16_t)Yellow, (uint16_t)Yellow, (uint16_t)Yellow}}, //valColor
{{(uint16_t)White, (uint16_t)White}, {(uint16_t)White, (uint16_t)White, (uint16_t)White}}, //unitColor
{{(uint16_t)White, (uint16_t)Gray}, {(uint16_t)Black, (uint16_t)Red, (uint16_t)White}}, //cursorColor
{{(uint16_t)White, (uint16_t)Yellow}, {(uint16_t)Black, (uint16_t)Red, (uint16_t)Red}}, //titleColor
};
//控制BH1750 设置接口
result high_lux()
{
// reduce measurement time - needed in direct sun light
lightMeter.setMTreg(32);
return proceed;
}
result Mid_lux()
{
// typical light environment
lightMeter.setMTreg(32);
return proceed;
}
result Low_lux()
{
// very low light environment
lightMeter.setMTreg(32);
return proceed;
}
//customizing a prompt look!
//by extending the prompt class
//this prompt will count seconds and update himself on the screen.
class altPrompt:public prompt {
public:
unsigned int t=0;
unsigned int last=0;
altPrompt(constMEM promptShadow& p):prompt(p) {}
Used printTo(navRoot &root,bool sel,menuOut& out, idx_t idx,idx_t len,idx_t) override {
last=t;
return out.printRaw(String(t).c_str(),len);
}
virtual bool changed(const navNode &nav,const menuOut& out,bool sub=true) {
t=millis()/1000;
return last!=t;
}
};
int selTest=0;
SELECT(selTest,LuxSelect,"LigthMode",doNothing,noEvent,noStyle
,VALUE("High",0,high_lux,noEvent)
,VALUE("Mid",1,Mid_lux,noEvent)
,VALUE("Low",2,Low_lux,noEvent)
);主菜单设置
MENU(mainMenu,"2024 Let's go No.3",doNothing,noEvent,wrapStyle
  ,SUBMENU(setLed)
  ,OP("servo On",servo_control,enterEvent)
  //,OP("LED Off",myLedOff,enterEvent)
  ,SUBMENU(LuxSelect)
  //,MENU(light_menu)
  ,FIELD(light_lux,"Light: "," lux",0,65535,10,1,doNothing,anyEvent,noStyle)
  //,altOP(altPrompt,"",doNothing,anyEvent)
  ,EXIT("<Back")
);
空闲设置界面
//when menu is suspended
//this function is called when entering or leaving suspended state
// with idleStart and idleend cases
//and at least once in between them (idling case)
//it might also be called for every pool (when in suspended state, idling case)
//for output devices that require refresh (repeated draw, idling case)
result idle(menuOut &o, idleEvent e) {
  o.clear();
  switch(e) {
    case idleStart:o.println("suspending menu!");break;
    case idling:o.println("suspended...");break;
    case idleEnd:o.println("resuming menu.");break;
  }
  return proceed;
}
const panel panels[] MEMMODE = {{0, 0, GFX_WIDTH / fontW, GFX_HEIGHT / fontH}};
navNode* nodes[sizeof(panels) / sizeof(panel)]; //navNodes to store navigation status
panelsList pList(panels, nodes, sizeof(panels) / sizeof(panel)); //a list of panels and nodes
idx_t eSpiTops[MAX_DEPTH]={0};
TFT_eSPIOut eSpiOut(tft,display_colors,eSpiTops,pList,fontW,fontH+1);
menuOut* constMEM outputs[] MEMMODE={&outSerial,&eSpiOut};//list of output devices
outputsList out(outputs,sizeof(outputs)/sizeof(menuOut*));//outputs list controller
NAVROOT(nav,mainMenu,MAX_DEPTH,serial,out);主循环添加如下代码用于界面动态绘制
nav.poll();//this device only draws when needed按键驱动
按键使用poelstra/MultiButton @ ^1.3.0
首先进行include
#include <PinButton.h>
指定管脚并进行对象创建
PinButton btnUp(BTN_UP); PinButton btnDwn(BTN_DWN);
编写loop函数,用于检测按键状态
void button_loop()
{
// Check for button presses
// btnUp.loop();
// btnDwn.loop();
btnDwn.update();
btnUp.update();
if(btnUp.isSingleClick())
{
nav.doNav(upCmd);
}
if(btnUp.isLongClick())
{
nav.doNav(enterCmd);
}
if(btnDwn.isSingleClick())
{
nav.doNav(downCmd);
}
if(btnDwn.isLongClick())
{
nav.doNav(escCmd);
}
}我这里设置了短按是上下菜单切换,长按是进入和退出操作,将上述检测加入主循环即可
电机控制
此次活动我使用的是180*电机,控制舵机的旋转角度是需要一个周期为20ms左右的脉冲,通过控制脉冲的高电平就能控制旋转角度,控制逻辑如下;
0.5ms ---0度
1ms --- 45度
1.5ms --- 90度
2ms --- 135度
2.5ms --- 180度
这里记录下线的连接方法:三根线:GND(棕色,接负极)、VCC(红色,接电源正极,电压在4.8V~6V之间)和SIG(黄色,信号线)。
这里使用的是 madhephaestus/ESP32Servo @ ^3.0.5
首先进行库引入,申请变量
#include <ESP32Servo.h> Servo servo1;
setup中进行timer及周期设置
//Allow allocation of all timers ESP32PWM::allocateTimer(0); ESP32PWM::allocateTimer(1); ESP32PWM::allocateTimer(2); ESP32PWM::allocateTimer(3); servo1.setPeriodHertz(50); // Standard 50hz servo 20ms servo1.attach(servo1Pin, minUs, maxUs);
这里控制实现就是从0到180,然后从180在 到0进行回旋
void servo_control(void)
{
for (pos = 0; pos <= 180; pos += 1) { // sweep from 0 degrees to 180 degrees
// in steps of 1 degree
servo1.write(pos);
delay(15); // waits 20ms for the servo to reach the position
}
for (pos = 180; pos >= 0; pos -= 1) { // sweep from 180 degrees to 0 degrees
servo1.write(pos);
delay(15);
}
}这里实现代码如下
#include <Arduino.h>
#include <Wire.h>
#include <TFT_eSPI.h> // 引入 TFT_eSPI 库
#include <BH1750.h>
#include <menu.h>
#include <menuIO/TFT_eSPIOut.h>
#include <menuIO/serialIO.h>
#include <PinButton.h>
#include <ESP32Servo.h>
#include <BLEDevice.h>
#include <BLEServer.h>
#include <BLEUtils.h>
#include <BLE2902.h>
#define BTN_UP 5 // Pinnumber for button for up/previous and select / enter actions (don't change this if you want to use the onboard buttons)
#define BTN_DWN 6 // Pinnumber for button for down/next and back / exit actions (don't change this if you want to use the onboard buttons)
using namespace Menu;
#define Black RGB565(0,0,0)
#define Red RGB565(255,0,0)
#define Green RGB565(0,255,0)
#define Blue RGB565(0,0,255)
#define Gray RGB565(128,128,128)
#define LighterRed RGB565(255,150,150)
#define LighterGreen RGB565(150,255,150)
#define LighterBlue RGB565(150,150,255)
#define DarkerRed RGB565(150,0,0)
#define DarkerGreen RGB565(0,150,0)
#define DarkerBlue RGB565(0,0,150)
#define Cyan RGB565(0,255,255)
#define Magenta RGB565(255,0,255)
#define Yellow RGB565(255,255,0)
#define White RGB565(255,255,255)
#define MAX_DEPTH 2
#define GFX_WIDTH 240
#define GFX_HEIGHT 135
#define fontW 10
#define fontH 16
serialIn serial(Serial0);
idx_t serialTops[MAX_DEPTH]={0};
serialOut outSerial(Serial0,serialTops);
TFT_eSPI tft; // 创建 TFT_eSPI 对象
BH1750 lightMeter;
int ledCtrl=LOW;
int light_lux =1;
int cur_s =0;
//Button2 btnUp(BTN_UP); // Initialize the up button
//Button2 btnDwn(BTN_DWN); // Initialize the down button
PinButton btnUp(BTN_UP);
PinButton btnDwn(BTN_DWN);
// create four servo objects
Servo servo1;
// Published values for SG90 servos; adjust if needed
int minUs = 1000;
int maxUs = 2000;
int servo1Pin = 9;
int pos = 0; // position in degrees
BLEServer *pServer = NULL;
BLECharacteristic * pTxCharacteristic;
bool deviceConnected = false;
bool oldDeviceConnected = false;
uint8_t txValue = 0;
// See the following for generating UUIDs:
// https://www.uuidgenerator.net/
#define SERVICE_UUID "6E400001-B5A3-F393-E0A9-E50E24DCCA9E" // UART service UUID
#define CHARACTERISTIC_UUID_RX "6E400002-B5A3-F393-E0A9-E50E24DCCA9E"
#define CHARACTERISTIC_UUID_TX "6E400003-B5A3-F393-E0A9-E50E24DCCA9E"
const colorDef<uint16_t> display_colors[6] MEMMODE = {
//{{disabled normal,disabled selected},{enabled normal,enabled selected, enabled editing}}
{{(uint16_t)Black, (uint16_t)Black}, {(uint16_t)Black, (uint16_t)Red, (uint16_t)Red}}, //bgColor
{{(uint16_t)White, (uint16_t)White}, {(uint16_t)White, (uint16_t)White, (uint16_t)White}},//fgColor
{{(uint16_t)Red, (uint16_t)Red}, {(uint16_t)Yellow, (uint16_t)Yellow, (uint16_t)Yellow}}, //valColor
{{(uint16_t)White, (uint16_t)White}, {(uint16_t)White, (uint16_t)White, (uint16_t)White}}, //unitColor
{{(uint16_t)White, (uint16_t)Gray}, {(uint16_t)Black, (uint16_t)Red, (uint16_t)White}}, //cursorColor
{{(uint16_t)White, (uint16_t)Yellow}, {(uint16_t)Black, (uint16_t)Red, (uint16_t)Red}}, //titleColor
};
result high_lux()
{
// reduce measurement time - needed in direct sun light
lightMeter.setMTreg(32);
return proceed;
}
result Mid_lux()
{
// typical light environment
lightMeter.setMTreg(32);
return proceed;
}
result Low_lux()
{
// very low light environment
lightMeter.setMTreg(32);
return proceed;
}
// result myLedOn() {
// ledCtrl= LOW;
// return proceed;
// }
// result myLedOff() {
// ledCtrl= HIGH;
// return proceed;
// }
TOGGLE(ledCtrl,setLed,"Led: ",doNothing,noEvent,noStyle//,doExit,enterEvent,noStyle
,VALUE("On",HIGH,doNothing,noEvent)
,VALUE("Off",LOW,doNothing,noEvent)
);
//customizing a prompt look!
//by extending the prompt class
//this prompt will count seconds and update himself on the screen.
class altPrompt:public prompt {
public:
unsigned int t=0;
unsigned int last=0;
altPrompt(constMEM promptShadow& p):prompt(p) {}
Used printTo(navRoot &root,bool sel,menuOut& out, idx_t idx,idx_t len,idx_t) override {
last=t;
return out.printRaw(String(t).c_str(),len);
}
virtual bool changed(const navNode &nav,const menuOut& out,bool sub=true) {
t=millis()/1000;
return last!=t;
}
};
int selTest=0;
SELECT(selTest,LuxSelect,"LigthMode",doNothing,noEvent,noStyle
,VALUE("High",0,high_lux,noEvent)
,VALUE("Mid",1,Mid_lux,noEvent)
,VALUE("Low",2,Low_lux,noEvent)
);
void servo_control(void)
{
for (pos = 0; pos <= 180; pos += 1) { // sweep from 0 degrees to 180 degrees
// in steps of 1 degree
servo1.write(pos);
delay(15); // waits 20ms for the servo to reach the position
}
for (pos = 180; pos >= 0; pos -= 1) { // sweep from 180 degrees to 0 degrees
servo1.write(pos);
delay(15);
}
}
MENU(mainMenu,"2024 Let's go No.3",doNothing,noEvent,wrapStyle
,SUBMENU(setLed)
,OP("servo On",servo_control,enterEvent)
//,OP("LED Off",myLedOff,enterEvent)
,SUBMENU(LuxSelect)
//,MENU(light_menu)
,FIELD(light_lux,"Light: "," lux",0,65535,10,1,doNothing,anyEvent,noStyle)
//,altOP(altPrompt,"",doNothing,anyEvent)
,EXIT("<Back")
);
//when menu is suspended
//this function is called when entering or leaving suspended state
// with idleStart and idleend cases
//and at least once in between them (idling case)
//it might also be called for every pool (when in suspended state, idling case)
//for output devices that require refresh (repeated draw, idling case)
result idle(menuOut &o, idleEvent e) {
o.clear();
switch(e) {
case idleStart:o.println("suspending menu!");break;
case idling:o.println("suspended...");break;
case idleEnd:o.println("resuming menu.");break;
}
return proceed;
}
const panel panels[] MEMMODE = {{0, 0, GFX_WIDTH / fontW, GFX_HEIGHT / fontH}};
navNode* nodes[sizeof(panels) / sizeof(panel)]; //navNodes to store navigation status
panelsList pList(panels, nodes, sizeof(panels) / sizeof(panel)); //a list of panels and nodes
idx_t eSpiTops[MAX_DEPTH]={0};
TFT_eSPIOut eSpiOut(tft,display_colors,eSpiTops,pList,fontW,fontH+1);
menuOut* constMEM outputs[] MEMMODE={&outSerial,&eSpiOut};//list of output devices
outputsList out(outputs,sizeof(outputs)/sizeof(menuOut*));//outputs list controller
NAVROOT(nav,mainMenu,MAX_DEPTH,serial,out);
void button_loop()
{
    // Check for button presses
    // btnUp.loop();
    // btnDwn.loop();
    btnDwn.update();
    btnUp.update();

    if(btnUp.isSingleClick())
    {
         nav.doNav(upCmd);
    }
    if(btnUp.isLongClick())
    {
        nav.doNav(enterCmd);
    }
    if(btnDwn.isSingleClick())
    {
         nav.doNav(downCmd);
    }
    if(btnDwn.isLongClick())
    {
        nav.doNav(escCmd);
    }

}
class MyServerCallbacks: public BLEServerCallbacks {
void onConnect(BLEServer* pServer) {
deviceConnected = true;
};
void onDisconnect(BLEServer* pServer) {
deviceConnected = false;
}
};
class MyCallbacks: public BLECharacteristicCallbacks {
void onWrite(BLECharacteristic *pCharacteristic) {
std::string rxValue = pCharacteristic->getValue();
if (rxValue.length() > 0) {
Serial0.println("*********");
Serial0.print("Received Value: ");
for (int i = 0; i < rxValue.length(); i++)
Serial0.print(rxValue[i]);
servo_control();
Serial0.println();
Serial0.println("*********");
}
}
};
void setup()
{
Wire.setPins(42,41);
Wire.begin();
lightMeter.begin(BH1750::ONE_TIME_HIGH_RES_MODE);
// initialize LED digital pin as an output.
pinMode(LED_BUILTIN, OUTPUT);
Serial0.begin(115200);
while (!Serial0);
Serial0.println("MENU CONFIG DEMO");
Serial0.flush();
Serial0.flush();
Serial0.println();
Serial0.print("Digkey&PPEW Let's Go No.3");
tft.init(); // 初始化 TFT 屏幕
tft.setRotation(3); // 调整屏幕方向,根据需要选择合适的值(0、1、2、3)
tft.fillScreen(TFT_BLACK); // 设置屏幕背景颜色为黑色
tft.setTextSize(2); // 设置文本大小
tft.setTextColor(TFT_YELLOW,TFT_BLACK); // 设置文本颜色为白色
nav.idleTask = idle;//point a function to be used when menu is suspended
nav.showTitle = true;
Serial0.println("DONE");
//Allow allocation of all timers
    ESP32PWM::allocateTimer(0);
    ESP32PWM::allocateTimer(1);
    ESP32PWM::allocateTimer(2);
    ESP32PWM::allocateTimer(3);
    servo1.setPeriodHertz(50);      // Standard 50hz servo 20ms
    servo1.attach(servo1Pin, minUs, maxUs);
// Create the BLE Device
BLEDevice::init("UART Service");
// Create the BLE Server
pServer = BLEDevice::createServer();
pServer->setCallbacks(new MyServerCallbacks());
// Create the BLE Service
BLEService *pService = pServer->createService(SERVICE_UUID);
// Create a BLE Characteristic
pTxCharacteristic = pService->createCharacteristic(
CHARACTERISTIC_UUID_TX,
BLECharacteristic::PROPERTY_NOTIFY
);
pTxCharacteristic->addDescriptor(new BLE2902());
BLECharacteristic * pRxCharacteristic = pService->createCharacteristic(
CHARACTERISTIC_UUID_RX,
BLECharacteristic::PROPERTY_WRITE
);
pRxCharacteristic->setCallbacks(new MyCallbacks());
// Start the service
pService->start();
// Start advertising
pServer->getAdvertising()->start();
Serial.println("Waiting a client connection to notify...");
}
void loop()
{
button_loop();
cur_s =millis()/1000;
if (lightMeter.measurementReady(true)) {
float lux = lightMeter.readLightLevel();
Serial0.print(F("Light: "));
Serial0.print(lux);
Serial0.println(F(" lx"));
lightMeter.configure(BH1750::ONE_TIME_HIGH_RES_MODE);
if (lux < 0) {
Serial0.println(F("Error condition detected"));
}
else
{
light_lux= (int)lux;
}
}
//Serial0.print("hello world\n");
nav.poll();//this device only draws when needed
digitalWrite(LED_BUILTIN,ledCtrl);
if (deviceConnected) {
pTxCharacteristic->setValue(light_lux);
pTxCharacteristic->notify();
delay(10); // bluetooth stack will go into congestion, if too many packets are sent
}
// disconnecting
if (!deviceConnected && oldDeviceConnected) {
delay(500); // give the bluetooth stack the chance to get things ready
pServer->startAdvertising(); // restart advertising
Serial.println("start advertising");
oldDeviceConnected = deviceConnected;
}
// connecting
if (deviceConnected && !oldDeviceConnected) {
// do stuff here on connecting
oldDeviceConnected = deviceConnected;
}
}环境搭建效果
 我要赚赏金
我要赚赏金 STM32
STM32 MCU
MCU 通讯及无线技术
 物联网技术
物联网技术 电子DIY
电子DIY 板卡试用
板卡试用 基础知识
基础知识 软件与操作系统
 我爱生活
我爱生活 小e食堂
小e食堂

