这些小活动你都参加了吗?快来围观一下吧!>>
电子产品世界 » 论坛首页 » 高校专区 » 漓东e学堂 » 32号的作业本 更新

共34条 4/4 |‹ 1 2 3 4 跳转至
菜鸟
2014-12-25 11:47:03     打赏
31楼
/* Includes ------------------------------------------------------------------*/     
03.#include "stm32f10x.h"     
04.#include "stm32_eval.h"      
05.#include      
06.  
07.volatile int flag;     
08.#define Set_B20()    GPIO_SetBits(GPIOC, GPIO_Pin_12)      //上拉关闭PC12     
09.#define Reset_B20()  GPIO_ResetBits(GPIOC, GPIO_Pin_12)  //下拉打开PC12     
10.#define Read_B20()   GPIO_ReadInputDataBit(GPIOC,GPIO_Pin_12)  //读PC12状态     
11.unsigned char Error_Flag=0;     
12.unsigned char zf=0;     
13.void SysTick_Configuration(void)     
14.{     
15.  /* Setup SysTick Timer for 10 msec interrupts  */     
16.  if (SysTick_Config(48000))                //SysTick配置     
17.  {      
18.    /* Capture error */      
19.    while (1);     
20.  }       
21. /* Configure the SysTick handler priority */     
22.  NVIC_SetPriority(SysTick_IRQn, 0x0);                       //SysTick中断优先级     
23.}     
24.     
25.     
26./** @addtogroup STM32F10x_StdPeriph_Examples   
27.  * @{   
28.  */     
29.     
30./** @addtogroup EXTI_Config   
31.  * @{   
32.  */      
33.     
34./* Private typedef -----------------------------------------------------------*/     
35./* Private define ------------------------------------------------------------*/     
36./* Private macro -------------------------------------------------------------*/     
37./* Private variables ---------------------------------------------------------*/     
38.GPIO_InitTypeDef   GPIO_InitStructure;  //结构体的命名   
39.USART_InitTypeDef USART_InitStructure;  //结构体的命名   
40.USART_ClockInitTypeDef USART_ClockInitStructure;  //结构体的命名   
41.     
42.void RCC_Configuration(void)     
43.{     
44.  RCC_DeInit();                 //将外设RCC的所有寄存器重新设为缺省值       
45.         
46.  RCC_HSICmd(ENABLE);            //使能内部高速晶振       
47.  while(RCC_GetFlagStatus(RCC_FLAG_HSIRDY) == RESET);      //当SHI晶振就绪则重新设定      
48.       
49.  RCC_SYSCLKConfig(RCC_SYSCLKSource_HSI);      //设置系统时钟,选择SHI时钟为系统时钟     
50.       
51.  RCC_HSEConfig(RCC_HSE_OFF);     //设置外部高速晶振,HSE晶振OFF      
52.  RCC_LSEConfig(RCC_LSE_OFF);      //设置外部低速晶振,LSE晶振OFF       
53.         
54.    //******配置PLL时钟频率为48MHZ*******//     
55.         
56.  RCC_PLLConfig(RCC_PLLSource_HSI_Div2,RCC_PLLMul_8);    //RCC_PLLMul_x 即设置PLL时钟频率为 6*x MHz     
57.         
58.  //************************************//       
59.         
60.  RCC_PLLCmd(ENABLE);             ////*******************使能PLL      
61.  while(RCC_GetFlagStatus(RCC_FLAG_PLLRDY) == RESET);        //PLL就绪       
62.  RCC_ADCCLKConfig(RCC_PCLK2_Div4);                     //  ADC时钟=PCLK/2       
63.  RCC_PCLK2Config(RCC_HCLK_Div1);                       //  APB2时钟=HCLK      
64.  RCC_PCLK1Config(RCC_HCLK_Div2);            /// APB1时钟=HCLK/2       
65.  RCC_HCLKConfig(RCC_SYSCLK_Div1);         //  AHB时钟=系统时钟      
66.  RCC_SYSCLKConfig(RCC_SYSCLKSource_PLLCLK);       // 选择PLL为系统时钟       
67.  while(RCC_GetSYSCLKSource() != 0x08);        //当PLL不是系统时钟      
68.     
69.         
70.//  SystemInit();     
71.         
72.    RCC_APB2PeriphClockCmd(RCC_APB2Periph_GPIOD|RCC_APB2Periph_AFIO, ENABLE); //使能APB2外设时钟/****GPIOD时钟和功能复用IO时钟***/       
73. GPIO_PinRemapConfig(GPIO_Remap_SWJ_JTAGDisable,ENABLE);//disable JTAG    SW_DP使能       
74.RCC_APB2PeriphClockCmd(RCC_APB2Periph_GPIOD|RCC_APB2Periph_AFIO, ENABLE);     
75. GPIO_PinRemapConfig(GPIO_Remap_SWJ_JTAGDisable,ENABLE);//disable JTAG     
76.  GPIO_InitStructure.GPIO_Pin = GPIO_Pin_2;         // //选择设置GPIO管脚      
77.  GPIO_InitStructure.GPIO_Speed = GPIO_Speed_50MHz;  ////设置管脚速率       
78.  GPIO_InitStructure.GPIO_Mode = GPIO_Mode_Out_PP;     ////设置管脚工作状态,此为推挽输出       
79.  GPIO_Init(GPIOD, &GPIO_InitStructure);    //初始化GPIOD      
80.    GPIO_ResetBits(GPIOD,GPIO_Pin_2);     //上拉关闭蜂鸣器       
81.    RCC_APB2PeriphClockCmd(RCC_APB2Periph_GPIOC|RCC_APB2Periph_AFIO, ENABLE);     
82. GPIO_PinRemapConfig(GPIO_Remap_SWJ_JTAGDisable,ENABLE);//disable JTAG     
83.  GPIO_InitStructure.GPIO_Pin = GPIO_Pin_0|GPIO_Pin_1|GPIO_Pin_2|GPIO_Pin_3|GPIO_Pin_4|GPIO_Pin_5|GPIO_Pin_6|GPIO_Pin_7;//LED     
84.  GPIO_InitStructure.GPIO_Speed = GPIO_Speed_50MHz;     
85.  GPIO_InitStructure.GPIO_Mode = GPIO_Mode_Out_PP;     
86.  GPIO_Init(GPIOC, &GPIO_InitStructure);     
87.    GPIO_SetBits(GPIOC,GPIO_Pin_0|GPIO_Pin_1|GPIO_Pin_2|GPIO_Pin_3|GPIO_Pin_4|GPIO_Pin_5|GPIO_Pin_6|GPIO_Pin_7); // GPIOC.0到GPIOC.7输出胃叩缙姜   
88.      RCC_APB1PeriphClockCmd(RCC_APB1Periph_TIM2, ENABLE); //使能TIM2时钟     
89.}      
90.     
91.void USART_int(long BaudRate)     
92.{     
93.    RCC_APB2PeriphClockCmd(RCC_APB2Periph_GPIOA|RCC_APB2Periph_USART1,ENABLE);//使能GPIOA、USART1外设时钟     
94.       GPIO_InitStructure.GPIO_Pin = GPIO_Pin_9;     
95.    GPIO_InitStructure.GPIO_Speed = GPIO_Speed_50MHz;  //GPIO的输出速率为50MHz   
96.    GPIO_InitStructure.GPIO_Mode = GPIO_Mode_AF_PP;      
97.    GPIO_Init(GPIOA, &GPIO_InitStructure);     
98.    /* PA10 USART1_Rx  */     
99.    GPIO_InitStructure.GPIO_Pin = GPIO_Pin_10;     
100.    GPIO_InitStructure.GPIO_Mode = GPIO_Mode_IN_FLOATING; //使能外设GPIOC端口时钟   
101.    GPIO_Init(GPIOA, &GPIO_InitStructure);     
102.  /* USARTx configured as follow:   
103.        - BaudRate = 115200 baud     
104.        - Word Length = 8 Bits   
105.        - One Stop Bit   
106.        - No parity   
107.        - Hardware flow control disabled (RTS and CTS signals)   
108.        - Receive and transmit enabled   
109.  */     
110.  USART_InitStructure.USART_BaudRate = BaudRate;//设置USART传输波特率  BaudRate = 9600 可以直接写9600     
111.  USART_InitStructure.USART_WordLength = USART_WordLength_8b;//一帧传输或者接收的数据位数为8bit     
112.  USART_InitStructure.USART_StopBits = USART_StopBits_1;//在帧结尾传输一个停止位     
113.  USART_InitStructure.USART_Parity = USART_Parity_No;//奇偶模式失能     
114.  USART_InitStructure.USART_HardwareFlowControl = USART_HardwareFlowControl_None;//硬件流控制失能     
115.  USART_InitStructure.USART_Mode = USART_Mode_Rx | USART_Mode_Tx;//使能接收发模式     
116.    USART_ClockInitStructure.USART_Clock = USART_Clock_Disable;    //时钟低电平活动     
117.    USART_ClockInitStructure.USART_CPOL = USART_CPOL_Low;      //引脚时钟输出低电平时钟     
118.    USART_ClockInitStructure.USART_CPHA = USART_CPHA_2Edge;     //第二个时钟边沿开始捕获数据     
119.    USART_ClockInitStructure.USART_LastBit = USART_LastBit_Disable;//最后一位数据的时钟脉冲不从SCLK输出     
120.    USART_ClockInit(USART1, &USART_ClockInitStructure); //引用结构体的成员    
121.  USART_Init(USART1, &USART_InitStructure);//USART1初始化     
122.  USART_Cmd(USART1, ENABLE);//使能USART1时钟外设     
123.    USART_ITConfig(USART1, USART_IT_RXNE, ENABLE);//使能接受中断     
124. USART_Cmd(USART1, ENABLE);  //使能 USART   
125.}     
126.     
127.void delay_18b20(u32 nus)    //18b20按照严格的时序工作,这是特定的一个延时函数(自定义)   
128.{     
129.    u16 i;     
130.    while(nus--)     
131.        for(i=12;i>0;i--);     
132.}     
133.     
134.     
135.         
136.void Init18B20(void)  //18B20初始化     
137.{     
138.   u8 aa=0;     
139.   u8 count =0;     
140.    RCC_APB2PeriphClockCmd(RCC_APB2Periph_GPIOC, ENABLE);//使能PC时钟     
141.  GPIO_InitStructure.GPIO_Pin = GPIO_Pin_12;  //配置端口GPIOC.12   
142.  GPIO_InitStructure.GPIO_Mode = GPIO_Mode_Out_OD;//开漏输出     
143.  GPIO_Init(GPIOC, &GPIO_InitStructure); //引用结构体的变量    
144.   Set_B20() ;   // GPIO_SetBits(GPIOC, GPIO_Pin_12)      
145.   delay_18b20(1);     
146.   Reset_B20();  //重置18B20   
147.       
148.     
149.   delay_18b20(480);     
150.   Set_B20();     
151.//  delay_18b20(500);     
152.   delay_18b20(480);     
153.     
154.    count=0;     
155.    aa=Read_B20();         //温度读取     
156.    /****个人认为限制温度不超过99度,作为一个保护*/     
157.    while(!aa && count<100)  //判断aa的非和计数器count的值是否都小于100      
158.   {     
159.    aa=Read_B20();  //   
160.    count++;          //count自加1    
161.   }     
162.   if(count>=99)     
163.        Error_Flag=1;  //错误返回值1   
164.    else     
165.        Error_Flag=0;  //错误返回值0   
166.        
167.}     
168.       
169.unsigned char Read18B20(void)//按位读取数据     
170.{       
171.unsigned char i=0;     
172.unsigned char date=0;     
173.u8 tempp;     
174.   for(i=8;i>0;i--)     
175.   {     
176.     
177.   Reset_B20();   //打开PC12     
178.   date>>=1;    //标志右移一位     
179.   delay_18b20(1);     
180.   Set_B20();    //关闭     
181.    delay_18b20(1);     
182.   tempp=Read_B20();   //读取温度     
183.     
184.   if(tempp)   //判断tempp是否为1   
185.        date|=0x80;     // 1000 0000   将最高位填1 ,然后右移,每次最高位由0变1,使8位全部传递完毕 0xff = 1111 1111     
186.    delay_18b20(60);  //延时   
187.    }     
188.    return(date);  //返回值是无符号的字符型的类型 date   
189.}     
190.void Write18B20(unsigned char date)//向18b20写数据     
191.{     
192.    unsigned char i=0;     
193.     
194.    for (i=8; i>0; i--)     
195.    {     
196.        Reset_B20();      
197.        delay_18b20(1);              
198.        if(date & 0x01)              
199.        {        
200.            Set_B20();     
201.        }     
202.        else     
203.        {   Reset_B20();}     
204.        delay_18b20(60);     
205.        date>>=1;           
206.         Set_B20();     
207.         delay_18b20(1);     
208.                 
209.    }     
210.    delay_18b20(15);     
211.}     
212.     
213. float Read_T()//读温度     
214.{        
215.        unsigned char TUp,TDown;     
216.    unsigned char fTemp;     
217.    u8 TT=0;     
218.     
219.     float Temp = 0;     
220.    Init18B20();     
221.    Write18B20(0xcc);          
222.    Write18B20(0x44);         
223.    Init18B20();     
224.    Write18B20(0xcc);        
225.    Write18B20(0xbe);        
226.    TDown = Read18B20();         
227.    TUp = Read18B20();           
228.         
229.    if(TUp>0x7f)           
230.    {     
231.        TDown=~TDown;       
232.        TUp=~TUp+1;      
233.        TUp/=8;               
234.        zf=1;              
235.    }     
236.    else     
237.        zf=0;          
238.     
239.    fTemp=TDown&0x0f;            
240.    TUp<<=4;     
241.    TDown>>=4;     
242.    TT=TUp|TDown;     
243.    Temp=TT+(float)fTemp/16;             
244.    return(Temp);     
245.}     
246.                                      
247.int main(void)     
248.{     
249.             
250.  /*!< At this stage the microcontroller clock setting is already configured,    
251.       this is done through SystemInit() function which is called from startup   
252.       file (startup_stm32f10x_xx.s) before to branch to application main.   
253.       To reconfigure the default setting of SystemInit() function, refer to   
254.       system_stm32f10x.c file   
255.     */          
256.            
257.  /* System Clocks Configuration */     
258.    char AddressID[10];  //定义一个字符型数组,长度为10   
259.    int i;     
260.  RCC_Configuration();  //配置RCC时钟   
261.  USART_int(115200);  //波特率的设置   
262.    SysTick_Configuration();  //系统滴答时钟的调用   
263.    printf(" config done...\r\n"); //打印输出    
264.     //delay_ms(1000);     
265.         
266.    Init18B20();     //初始化18b20;   
267.    Write18B20(0x34);  //写入读取地址的命令     
268.    delay_18b20(20);     //延时   
269.    
270.    while(1)     
271.    {     
272.        if(flag == 300)  //判断flag是否等于300   
273.        {     
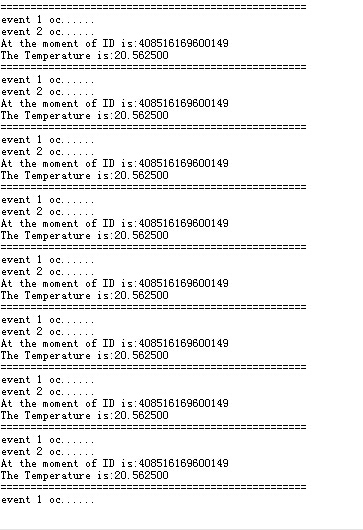
274.            printf(" the  AddressID is:") ;      
275.            for(i=0;i<10;i++)     //字符不能直接输出,要按位输出     
276.        {     
277.                    AddressID[i] = Read18B20();//读取地址     
278.          printf("%u", AddressID[i]);//输出地址     
279.        }     
280.            printf("\r\n")  ; //换行    
281.        }     
282.        if(flag == 500)  //判断flag是否等于500   
283.        {                
284.            printf("The Temperature is:%f\r\n",Read_T());//读取温度并输出     
285.                       
286.            printf("===================================================\r\n");     
287.    }     
288.    }     
289.}     
290.     
291.     
292.     
293.#ifdef  USE_FULL_ASSERT     
294.     
295./**   
296.  * @brief  Reports the name of the source file and the source line number   
297.  *         where the assert_param error has occurred.   
298.  * @param  file: pointer to the source file name   
299.  * @param  line: assert_param error line source number   
300.  * @retval None   
301.  */     
302.void assert_failed(uint8_t* file, uint32_t line)     
303.{      
304.  /* User can add his own implementation to report the file name and line number,   
305.     ex: printf("Wrong parameters value: file %s on line %d\r\n", file, line) */     
306.     
307.  /* Infinite loop */     
308.  while (1)     
309.  {     
310.  }     
311.}     
312.     
313.#endif     
314.     
315./**   
316.  * @}   
317.  */      
318.     
319./**   
320.  * @}   
321.  */      
322.     
323.#ifdef __GNUC__     
324.  /* With GCC/RAISONANCE, small printf (option LD Linker->Libraries->Small printf   
325.     set to 'Yes') calls __io_putchar() */     
326.  #define PUTCHAR_PROTOTYPE int __io_putchar(int ch)     
327.#else     
328.  #define PUTCHAR_PROTOTYPE int fputc(int ch, FILE *f)     
329.#endif /* __GNUC__ */     
330.       
331.     
332.     
333./**   
334.  * @brief  Retargets the C library printf function to the USART.   
335.  * @param  None   
336.  * @retval None   
337.  */     
338.PUTCHAR_PROTOTYPE     
339.{     
340.  /* Place your implementation of fputc here */     
341.  /* e.g. write a character to the USART */     
342.  USART_SendData(EVAL_COM1, (uint8_t) ch);     
343.     
344.  /* Loop until the end of transmission */     
345.  while (USART_GetFlagStatus(EVAL_COM1, USART_FLAG_TC) == RESET)     
346.  {}     
347.     
348.  return ch;     
349.}     
350.     
351.#ifdef  USE_FULL_ASSERT     
352.     
353./**   
354.  * @brief  Reports the name of the source file and the source line number   
355.  *         where the assert_param error has occurred.   
356.  * @param  file: pointer to the source file name   
357.  * @param  line: assert_param error line source number   
358.  * @retval None   
359.  */     
360.void assert_failed(uint8_t* file, uint32_t line)     
361.{      
362.  /* User can add his own implementation to report the file name and line number,   
363.     ex: printf("Wrong parameters value: file %s on line %d\r\n", file, line) */     
364.     
365.  /* Infinite loop */     
366.  while (1)     
367.  {     
368.  }     
369.}     
370.     
371.#endif  


菜鸟
2014-12-25 14:18:45     打赏
32楼
焊接图片焊接图片

菜鸟
2014-12-25 14:22:41     打赏
33楼
/* Includes ------------------------------------------------------------------*/    
#include "stm32f10x.h"    
#include "stm32_eval.h"     
#include  <stdio.h>   
  
volatile int flag;    
#define Set_B20()    GPIO_SetBits(GPIOC, GPIO_Pin_12)      //上拉关闭PC12    
#define Reset_B20()  GPIO_ResetBits(GPIOC, GPIO_Pin_12)  //下拉打开PC12    
#define Read_B20()   GPIO_ReadInputDataBit(GPIOC,GPIO_Pin_12)  //读PC12状态    
unsigned char Error_Flag=0;    
unsigned char zf=0;    
void SysTick_Configuration(void)    
{    
  /* Setup SysTick Timer for 10 msec interrupts  */    
  if (SysTick_Config(48000))                //SysTick配置    
  {     
    /* Capture error */     
    while (1);    
  }      
 /* Configure the SysTick handler priority */    
  NVIC_SetPriority(SysTick_IRQn, 0x0);                       //SysTick中断优先级    
}    
    
    
/** @addtogroup STM32F10x_StdPeriph_Examples  
  * @{  
  */    
    
/** @addtogroup EXTI_Config  
  * @{  
  */     
    
/* Private typedef -----------------------------------------------------------*/    
/* Private define ------------------------------------------------------------*/    
/* Private macro -------------------------------------------------------------*/    
/* Private variables ---------------------------------------------------------*/    
GPIO_InitTypeDef   GPIO_InitStructure;  //结构体的命名  
USART_InitTypeDef USART_InitStructure;  //结构体的命名  
USART_ClockInitTypeDef USART_ClockInitStructure;  //结构体的命名  
    
void RCC_Configuration(void)    
{    
  RCC_DeInit();                 //将外设RCC的所有寄存器重新设为缺省值      
        
  RCC_HSICmd(ENABLE);            //使能内部高速晶振      
  while(RCC_GetFlagStatus(RCC_FLAG_HSIRDY) == RESET);      //当SHI晶振就绪则重新设定     
      
  RCC_SYSCLKConfig(RCC_SYSCLKSource_HSI);      //设置系统时钟,选择SHI时钟为系统时钟    
      
  RCC_HSEConfig(RCC_HSE_OFF);     //设置外部高速晶振,HSE晶振OFF     
  RCC_LSEConfig(RCC_LSE_OFF);      //设置外部低速晶振,LSE晶振OFF      
        
    //******配置PLL时钟频率为48MHZ*******//    
        
  RCC_PLLConfig(RCC_PLLSource_HSI_Div2,RCC_PLLMul_8);    //RCC_PLLMul_x 即设置PLL时钟频率为 6*x MHz    
        
  //************************************//      
        
  RCC_PLLCmd(ENABLE);             ////*******************使能PLL     
  while(RCC_GetFlagStatus(RCC_FLAG_PLLRDY) == RESET);        //PLL就绪      
  RCC_ADCCLKConfig(RCC_PCLK2_Div4);                     //  ADC时钟=PCLK/2      
  RCC_PCLK2Config(RCC_HCLK_Div1);                       //  APB2时钟=HCLK     
  RCC_PCLK1Config(RCC_HCLK_Div2);            /// APB1时钟=HCLK/2      
  RCC_HCLKConfig(RCC_SYSCLK_Div1);         //  AHB时钟=系统时钟     
  RCC_SYSCLKConfig(RCC_SYSCLKSource_PLLCLK);       // 选择PLL为系统时钟      
  while(RCC_GetSYSCLKSource() != 0x08);        //当PLL不是系统时钟     
    
        
//  SystemInit();    
        
    RCC_APB2PeriphClockCmd(RCC_APB2Periph_GPIOD|RCC_APB2Periph_AFIO, ENABLE); //使能APB2外设时钟/****GPIOD时钟和功能复用IO时钟***/      
 GPIO_PinRemapConfig(GPIO_Remap_SWJ_JTAGDisable,ENABLE);//disable JTAG    SW_DP使能      
RCC_APB2PeriphClockCmd(RCC_APB2Periph_GPIOD|RCC_APB2Periph_AFIO, ENABLE);    
 GPIO_PinRemapConfig(GPIO_Remap_SWJ_JTAGDisable,ENABLE);//disable JTAG    
  GPIO_InitStructure.GPIO_Pin = GPIO_Pin_2;         // //选择设置GPIO管脚     
  GPIO_InitStructure.GPIO_Speed = GPIO_Speed_50MHz;  ////设置管脚速率      
  GPIO_InitStructure.GPIO_Mode = GPIO_Mode_Out_PP;     ////设置管脚工作状态,此为推挽输出      
  GPIO_Init(GPIOD, &GPIO_InitStructure);    //初始化GPIOD     
    GPIO_ResetBits(GPIOD,GPIO_Pin_2);     //上拉关闭蜂鸣器      
    RCC_APB2PeriphClockCmd(RCC_APB2Periph_GPIOC|RCC_APB2Periph_AFIO, ENABLE);    
 GPIO_PinRemapConfig(GPIO_Remap_SWJ_JTAGDisable,ENABLE);//disable JTAG    
  GPIO_InitStructure.GPIO_Pin = GPIO_Pin_0|GPIO_Pin_1|GPIO_Pin_2|GPIO_Pin_3|GPIO_Pin_4|GPIO_Pin_5|GPIO_Pin_6|GPIO_Pin_7;//LED    
  GPIO_InitStructure.GPIO_Speed = GPIO_Speed_50MHz;    
  GPIO_InitStructure.GPIO_Mode = GPIO_Mode_Out_PP;    
  GPIO_Init(GPIOC, &GPIO_InitStructure);    
    GPIO_SetBits(GPIOC,GPIO_Pin_0|GPIO_Pin_1|GPIO_Pin_2|GPIO_Pin_3|GPIO_Pin_4|GPIO_Pin_5|GPIO_Pin_6|GPIO_Pin_7); // GPIOC.0到GPIOC.7输出胃叩缙姜  
      RCC_APB1PeriphClockCmd(RCC_APB1Periph_TIM2, ENABLE); //使能TIM2时钟    
}     
    
void USART_int(long BaudRate)    
{    
    RCC_APB2PeriphClockCmd(RCC_APB2Periph_GPIOA|RCC_APB2Periph_USART1,ENABLE);//使能GPIOA、USART1外设时钟    
       GPIO_InitStructure.GPIO_Pin = GPIO_Pin_9;    
    GPIO_InitStructure.GPIO_Speed = GPIO_Speed_50MHz;  //GPIO的输出速率为50MHz  
    GPIO_InitStructure.GPIO_Mode = GPIO_Mode_AF_PP;     
    GPIO_Init(GPIOA, &GPIO_InitStructure);    
    /* PA10 USART1_Rx  */    
    GPIO_InitStructure.GPIO_Pin = GPIO_Pin_10;    
    GPIO_InitStructure.GPIO_Mode = GPIO_Mode_IN_FLOATING; //使能外设GPIOC端口时钟  
    GPIO_Init(GPIOA, &GPIO_InitStructure);    
  /* USARTx configured as follow:  
        - BaudRate = 115200 baud    
        - Word Length = 8 Bits  
        - One Stop Bit  
        - No parity  
        - Hardware flow control disabled (RTS and CTS signals)  
        - Receive and transmit enabled  
  */    
  USART_InitStructure.USART_BaudRate = BaudRate;//设置USART传输波特率  BaudRate = 9600 可以直接写9600    
  USART_InitStructure.USART_WordLength = USART_WordLength_8b;//一帧传输或者接收的数据位数为8bit    
  USART_InitStructure.USART_StopBits = USART_StopBits_1;//在帧结尾传输一个停止位    
  USART_InitStructure.USART_Parity = USART_Parity_No;//奇偶模式失能    
  USART_InitStructure.USART_HardwareFlowControl = USART_HardwareFlowControl_None;//硬件流控制失能    
  USART_InitStructure.USART_Mode = USART_Mode_Rx | USART_Mode_Tx;//使能接收发模式    
    USART_ClockInitStructure.USART_Clock = USART_Clock_Disable;    //时钟低电平活动    
    USART_ClockInitStructure.USART_CPOL = USART_CPOL_Low;      //引脚时钟输出低电平时钟    
    USART_ClockInitStructure.USART_CPHA = USART_CPHA_2Edge;     //第二个时钟边沿开始捕获数据    
    USART_ClockInitStructure.USART_LastBit = USART_LastBit_Disable;//最后一位数据的时钟脉冲不从SCLK输出    
    USART_ClockInit(USART1, &USART_ClockInitStructure); //引用结构体的成员   
  USART_Init(USART1, &USART_InitStructure);//USART1初始化    
  USART_Cmd(USART1, ENABLE);//使能USART1时钟外设    
    USART_ITConfig(USART1, USART_IT_RXNE, ENABLE);//使能接受中断    
 USART_Cmd(USART1, ENABLE);  //使能 USART  
}    
    
void delay_18b20(u32 nus)    //18b20按照严格的时序工作,这是特定的一个延时函数(自定义)  
{    
    u16 i;    
    while(nus--)    
        for(i=12;i>0;i--);    
}    


void Init18B20(void)  //18B20初始化    
{    
   u8 aa=0;    
   u8 count =0;    
    RCC_APB2PeriphClockCmd(RCC_APB2Periph_GPIOC, ENABLE);//使能PC时钟    
  GPIO_InitStructure.GPIO_Pin = GPIO_Pin_12;  //配置端口GPIOC.12  
  GPIO_InitStructure.GPIO_Mode = GPIO_Mode_Out_OD;//开漏输出    
  GPIO_Init(GPIOC, &GPIO_InitStructure); //引用结构体的变量   
   Set_B20() ;   // GPIO_SetBits(GPIOC, GPIO_Pin_12)     
   delay_18b20(1);    
   Reset_B20();  //重置18B20  
      
    
   delay_18b20(480);    
   Set_B20();    
//  delay_18b20(500);    
   delay_18b20(480);    
    
    count=0;    
    aa=Read_B20();         //温度读取    
    /****个人认为限制温度不超过99度,作为一个保护*/    
    while(!aa && count<100)  //判断aa的非和计数器count的值是否都小于100     
   {    
    aa=Read_B20();  //  
    count++;          //count自加1   
   }    
   if(count>=99)    
        Error_Flag=1;  //错误返回值1  
    else    
        Error_Flag=0;  //错误返回值0  
       
}    
      
unsigned char Read18B20(void)//按位读取数据    
{      
unsigned char i=0;    
unsigned char date=0;    
u8 tempp;    
   for(i=8;i>0;i--)    
   {    
    
   Reset_B20();   //打开PC12    
   date>>=1;    //标志右移一位    
   delay_18b20(1);    
   Set_B20();    //关闭    
    delay_18b20(1);    
   tempp=Read_B20();   //读取温度    
    
   if(tempp)   //判断tempp是否为1  
        date|=0x80;     // 1000 0000   将最高位填1 ,然后右移,每次最高位由0变1,使8位全部传递完毕 0xff = 1111 1111    
    delay_18b20(60);  //延时  
    }    
    return(date);  //返回值是无符号的字符型的类型 date  
}    
void Write18B20(unsigned char date)//向18b20写数据    
{    
    unsigned char i=0;    
    
    for (i=8; i>0; i--)    
    {    
        Reset_B20();     
        delay_18b20(1);             
        if(date & 0x01)             
        {       
            Set_B20();    
        }    
        else    
        {   Reset_B20();}    
        delay_18b20(60);    
        date>>=1;          
         Set_B20();    
         delay_18b20(1);    
                
    }    
    delay_18b20(15);    
}    
    
 float Read_T()//读温度    
{       
        unsigned char TUp,TDown;    
    unsigned char fTemp;    
    u8 TT=0;    
    
     float Temp = 0;    
    Init18B20();    
    Write18B20(0xcc);         
    Write18B20(0x44);        
    Init18B20();    
    Write18B20(0xcc);       
    Write18B20(0xbe);       
    TDown = Read18B20();        
    TUp = Read18B20();          
        
    if(TUp>0x7f)          
    {    
        TDown=~TDown;      
        TUp=~TUp+1;     
        TUp/=8;              
        zf=1;             
    }    
    else    
        zf=0;         
    
    fTemp=TDown&0x0f;           
    TUp<<=4;    
    TDown>>=4;    
    TT=TUp|TDown;    
    Temp=TT+(float)fTemp/16;            
    return(Temp);    
}    
                                   
int main(void)  
{  
          
  /*!< At this stage the microcontroller clock setting is already configured,  
       this is done through SystemInit() function which is called from startup 
       file (startup_stm32f10x_xx.s) before to branch to application main. 
       To reconfigure the default setting of SystemInit() function, refer to 
       system_stm32f10x.c file 
     */       
         
  /* System Clocks Configuration */  
    char ID[8];  
    int i;  
  RCC_Configuration();  
  USART_int(115200);  
    SysTick_Configuration();  
    printf(" config done...\r\n");  
  
      
    Init18B20();     //初始化  
    Write18B20(0x33);  //写入读取地址的命令  
    delay_18b20(20);  
    for(i=0;i<8;i++)   //这里必须用for不然 只会输出printf("event 1 oc......\r\n")这句,不会继续运行  
    {  
        ID[i] = Read18B20();//读取地址  
    }  
      
    while(1)  
    {  
        if(flag == 300)  
        {  
            printf("At the moment of ID is:")   ;   
            for(i=0;i<8;i++)     //字符不能直接输出,要按位输出  
        {  
          printf("%u",ID[i]);//输出地址  
        }  
            printf("\r\n")  ;  
        }  
        if(flag == 500)  
        {             
            printf("The Temperature is:%f\r\n",Read_T());//读取温度并输出  
            printf("===================================================\r\n");  
    }  
    }  
}  
  
    
#ifdef  USE_FULL_ASSERT    
    
/**  
  * @brief  Reports the name of the source file and the source line number  
  *         where the assert_param error has occurred.  
  * @param  file: pointer to the source file name  
  * @param  line: assert_param error line source number  
  * @retval None  
  */    
void assert_failed(uint8_t* file, uint32_t line)    
{     
  /* User can add his own implementation to report the file name and line number,  
     ex: printf("Wrong parameters value: file %s on line %d\r\n", file, line) */    
    
  /* Infinite loop */    
  while (1)    
  {    
  }    
}    
    
#endif    
    
/**  
  * @}  
  */     
    
/**  
  * @}  
  */     
    
#ifdef __GNUC__    
  /* With GCC/RAISONANCE, small printf (option LD Linker->Libraries->Small printf  
     set to 'Yes') calls __io_putchar() */    
  #define PUTCHAR_PROTOTYPE int __io_putchar(int ch)    
#else    
  #define PUTCHAR_PROTOTYPE int fputc(int ch, FILE *f)    
#endif /* __GNUC__ */    


/**  
  * @brief  Retargets the C library printf function to the USART.  
  * @param  None  
  * @retval None  
  */    
PUTCHAR_PROTOTYPE    
{    
  /* Place your implementation of fputc here */    
  /* e.g. write a character to the USART */    
  USART_SendData(EVAL_COM1, (uint8_t) ch);    
    
  /* Loop until the end of transmission */    
  while (USART_GetFlagStatus(EVAL_COM1, USART_FLAG_TC) == RESET)    
  {}    
    
  return ch;    
}    
    
#ifdef  USE_FULL_ASSERT    
    
/**  
  * @brief  Reports the name of the source file and the source line number  
  *         where the assert_param error has occurred.  
  * @param  file: pointer to the source file name  
  * @param  line: assert_param error line source number  
  * @retval None  
  */    
void assert_failed(uint8_t* file, uint32_t line)    
{     
  /* User can add his own implementation to report the file name and line number,  
     ex: printf("Wrong parameters value: file %s on line %d\r\n", file, line) */    
    
  /* Infinite loop */    
  while (1)    
  {    
  }    
}    
    
#endif


高工
2015-01-06 21:41:35     打赏
34楼
再接再厉吧

共34条 4/4 |‹ 1 2 3 4 跳转至

回复

匿名不能发帖!请先 [ 登陆 注册 ]