
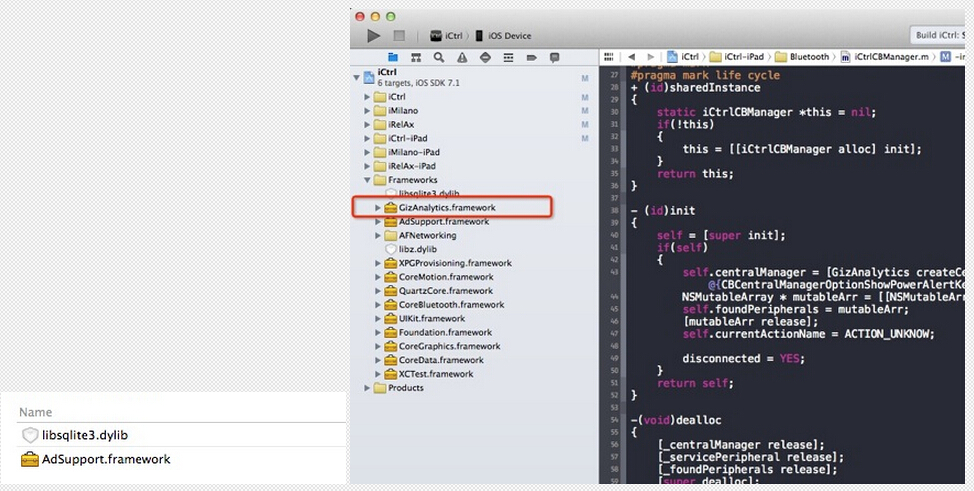
第一步:导入文件
将GizAnalytics导入到你的工程中,并确保项目添加了ADSupport.framework、sqlite3.dylib 依赖框架。如图
第二步:引入头文件并注册你的AppKey
1、打开AppDelegate.m(代表你的工程名字) 导入文件头:GizAnalytics.h
#import ,
2、在- (BOOL)application: didFinishLaunchingWithOptions:方法中调用initWithAppKey方法来初始化GizAnalytics:
- (BOOL)application:(UIApplication *)application didFinishLaunchingWithOptions:(NSDictionary *)launchOptions
{
[[GizAnalytics sharedInstance] initWithAppKey:@"YOUR_APP_KEY"]; //参数为机智云官网中添加应用后得到的AppKey
//……
return YES;
}
注:将"YOURAPPKEY"替换成你添加客户端时生成的 AppKey
第三步:配置机智云平台的统计分析
提示:机智云的统计分析为蓝牙操作提供了多种解决方案,以适应工程中不同的蓝牙业务:(仅选择适用您工程的方案即可)
工程还未有蓝牙模块:
方案一:使用单一的类来完成蓝牙所有的处理
1.为蓝牙处理类的.h文件添加(表示类名)
#import
2.实现以下delegate:
@interface ClassName:SuperClass //ClassName为您的类名,SuperClass为继承的超类
3.在该文件的@end语句上,添加两个属性:
@property (nonatomic,strong) CBCentralManager *centralManger;
@property (nonatomic,strong) CBPeripheral *peripheral;
4.在蓝牙处理类的.m文件的初始方法中添加代码:(表示类名)
-(id)init {
if(self = [super init]) {
self.centralManager = [GizAnalytics createCentralManagerWithDelegate:self CBPeripheralDelegate:self queue:nil options:nil];
//不需要再为peripheral设置delegate
}
return self;
}
方案二:使用两个或两个以上的类完成蓝牙处理
1.分别为处理蓝牙的central、peripheral类的.h文件添加:(表示类名)
#import
2.分别为处理蓝牙的central、peripheral类添加以下delegate:
@interface CentralClass:SuperClass//CentralClass为您处理蓝牙central类的类名,SuperClass为继承的超类
@interface PeripheralClass:SuperClass//CentralClass为您处理蓝牙central类的类名,SuperClass为继承的超类
3.分别为处理蓝牙的central、peripheral类添加各自属性:
//Central
@property (nonatomic,strong) CBCentralManager *centralManger;
//Peripheral
@property (nonatomic,strong) CBPeripheral *peripheral;
4.在蓝牙处理Central类的.m文件的初始方法中添加代码:(表示类名)
-(id)init {
if(self = [super init]) {
self.centralManager = [GizAnalytics createCentralManagerWithDelegate:self queue:nil options:nil];
}
return self;
}
5.在蓝牙处理Peripheral类的.m文件的初始方法中添加代码:(表示类名)
-(id)init {
if(self = [super init]) {
self.peripheral = [GizAnalytics createCBPeripheralDelegate:self];
}
return self;
}
工程已有蓝牙模块:
方案一:使用单一的类来完成蓝牙所有的处理
1.将
self.centralManager = [[CBCentralManager alloc] initWithDelegate:self queue:nil options:nil];
修改为
self.centralManager = [GizAnalytics createCentralManagerWithDelegate:self CBPeripheralDelegate:self queue:nil options:nil];
2.删除设置Peripheral的delegate代码:
//self. peripheral.degelate = self;
方案二:使用两个或两个以上的类完成蓝牙处理
1.在蓝牙处理Central类的.m文件的方法中:(表示类名)
将
self.centralManager = [[CBCentralManager alloc] initWithDelegate:self queue:nil options:nil];
替换为
self.centralManager = [GizAnalytics createCentralManagerWithDelegate:self queue:nil options:nil];
}
2.在蓝牙处理Peripheral类的.m文件的方法中:(表示类名)
将
self. peripheral.degelate = self;
替换为
self.peripheral = [GizAnalytics createCBPeripheralDelegate:self];
note: 1、options参数如果是nil,则iOS设备在没有蓝牙打开的情况下不会弹出提醒用户打开蓝牙的对话框,建议将参数填写为
{CBCentralManagerOptionShowPowerAlertKey:(YES)}。
2、此时已不再需要为peripheral属性设置degelate,即不需要以下代码:
self. peripheral.degelate = self;
3、不影响蓝牙的回调方法,业务逻辑; 4、在discoverServices:方法中,传入的发现服务数组中,必须包含UUID为180A的服务,代码如下:
[slef.centralManager discoverServices:@[CBUUID UUIDWithString:@"180A",...]] ;
或:
//当数组参数为nil表示搜索全部服务
[slef.centralManager discoverServices:nil]。
温馨提醒:一般会实现的蓝牙回调方法
centralManagerDidUpdateState:
centralManager:didDiscoverPeripheral:advertisementData:RSSI:
centralManager:didConnectPeripheral:
centralManager:didDisconnectPeripheral:error:
peripheral:didWriteValueForCharacteristic:error:
peripheral:didUpdateValueForCharacteristic:error:
peripheral:didDiscoverServices:
peripheral:(CBPeripheral *)peripheral didDiscoverCharacteristicsForService:(CBService *)service error:(NSError *)error
//.....
//其他CBCentralManagerDelegate、CBPeripheralDelegate方法,如有需要,可自行添加。
另附:使用机智云IOTSDK蓝牙框架的集成
将XPGConnect、GizAnalytics添加到您的工程中,(此处只给出XPGConnect的添加过程,GizAnalytics的添加及引用过程参考以上) 1.从"打包结果":上下载XPGConnect相关文件;
2.将XPGConnect拖入工程中
1.注意事项
iOS版本要求: >= 5.0 设备支持BT 4.0 使用ARC
2.Framework依赖
Corebluetooth.framework
3.基本流程
创建XPGPeerID 创建XPGServiceBrowser 对XPGServiceBrowser对象调用搜索设备方法 监听发现设备回调方法 创建XPGSession 邀请搜索到的设备进入Session 监听状态改变回调方法 XPGSession可以对设备进行基本蓝牙BLE操作(Read,write,RSSI) 通过XPGSession的回调方法,可以获得蓝牙BLE(Noty,Indicate)的回调
4.方法调用
在- (BOOL)application: didFinishLaunchingWithOptions:方法中调用initWithAppKey方法来初始化GizAnalytics:
- (BOOL)application:(UIApplication *)application didFinishLaunchingWithOptions:(NSDictionary *)launchOptions
{
[[GizAnalytics sharedInstance] initWithAppKey:@"YOUR_APP_KEY"]; //参数为机智云官网中添加应用后得到的AppKey
//……
return YES;
}
//初始化
@property (nonatomic, strong) XPGServiceBrowser *serviceBrowser;
@property (nonatomic, strong) XPGPeerID *peerID;
@property (nonatomic, strong) XPGPeerID *currentPeerID;
- (XPGPeerID *)peerID {
if (_peerID == nil) {
_peerID = [[XPGPeerID alloc] initWithName:@"XPGConnectDemo"];
}
return _peerID;
}
- (XPGServiceBrowser *)serviceBrowser {
if (_serviceBrowser == nil) {
_serviceBrowser = [[XPGServiceBrowser alloc] initWithPeer:self.peerID serviceType:@"BLE" transportType:kXPGConnectTransportTypeBLE];
_serviceBrowser.delegate = self;
[_serviceBrowser setCentralManager:[XAnalytics createCentralManagerWithDelegate: [self.serviceBrowser getCentralManagerDelegate] queue:nil options:nil]];
}
return _serviceBrowser;
}
//搜索设备
[self.serviceBrowser startBrowsing];
//搜索设备回调
- (void)browser:(XPGServiceBrowser *)browser foundPeer:(XPGPeerID *)peerID withServiceInfo:(NSDictionary *)serviceInfo;
//连接设备
[self.serviceBrowser invitePeer:peerID toSession:session withContext:Nil timeout:5];
//连接设备状态回调
- (void)session:(XPGConnectSession *)session peer:(XPGPeerID *)peerID didChangeState:(XPGSessionState)state {
switch (state) {
case kXPGSessionStateNotConnected:
break;
case kXPGSessionStateConnecting:
break;
case kXPGSessionStateConnected:
//set up Device
[XAnalytics createCBPeripheralDelegate:[session setupPeerForAnalytics:peerID]];
break;
default:
break;
}
}
//断开设备连接
[session cancelConnectPeer:peerID];
//BLE基本操作
//读
- (BOOL)readDataFromCurrentPeerwithContext:(NSString *)Context error:(NSError **)error {
BOOL isSuccess = [self.currentSession readDataFromPeer:self.currentPeerID withContext:Context error:error];
return isSuccess;
}
//写
- (BOOL)sendData:(NSData *)data toCurrentPeerwithContext:(NSString *)Context error:(NSError **)error {
BOOL isSuccess = [self.currentSession sendData:data toPeer:self.currentPeerID withContext:Context error:error];
return isSuccess;
}
//读取信号强度
- (void)readRSSIValueFromCurrentPeer {
[self.currentSession updateRSSIToPeer:self.currentPeerID];
}
//回调函数
- (void)session:(XPGConnectSession *)session didReceiveData:(NSData *)data fromPeer:(XPGPeerID *)peerID withContext:(NSString *)context;
//发送数据确认
- (void)session:(XPGConnectSession *)session didSendData:(NSData *)data forPeer:(XPGPeerID *)peerID withContext:(NSString *)context;
//回调信号强度RSSI
- (void)session:(XPGConnectSession *)session didReceiveRSSI:(NSNumber *)rssi fromPeer:(XPGPeerID *)peerID;
5.常见问题
建立了连接后,仍然无法通信?
因为BLE设备还需要先对Service做setNotify的操作,才能收到信息。
如何知道信息是从哪个Service返回的?
通过 withContext:(NSString *)context,context包含了Service的信息。
如果想过滤搜索的设备,该如何设置?
只要对XPGServiceBrowser对象,设置serviceTargets属性。此数组包含的是带有目标Service的NSString。例如:["180A"];
 STM32
STM32 MCU
MCU 通讯及无线技术
 物联网技术
物联网技术 电子DIY
电子DIY 板卡试用
板卡试用 基础知识
基础知识 软件与操作系统
 我爱生活
我爱生活 小e食堂
小e食堂

