
I spend too many hours coding and my main interface with the PC is definitely the keyboard. I could probably live with a crappy mouse but never with a mediocre keyboard. This is how I went from standard commercially available keyboards to a completely customized home-made beauty.
My interest in keyboards actually began when I started developing pain to my fingers. Too many shorcuts and too many combos with the modifiers. I eventually entered the very dangerous world of Mechanical Keyboards.
I tried every mechanical keyboard and every key switch I could (there are more than you may think). It’s a very complicated and interesting world dominated by factions and feuds. Who likes clicky switches, who likes light switches, who stiff switches, who capacitive Topre switches, who argues that Topres are not actually mechanical, who soft-tactile but only if carefully lubricated (by hand, one by one), and so on and so forth.
It’s a never ending quest, trying to find the Perfect combination of materials, switches, springs, controllers and it brings you to one inevitable conclusion: there’s no spoon. The perfect keyboard does not exist. Hence, build your own!
It’s easier than you think, but it takes a lot of dedication and time. Money speaking a custom keyboard goes around $150 + the keycaps.
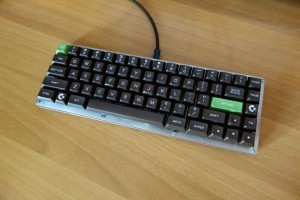
If you want your very own keyboard you are probably going to have an unusual layout. Mine is compact, with arrow cluster and few but important differences from a “standard” keyboard.
So the first problem to solve is where to find the keycaps in such unusual shapes. There are quite a few companies that can make keycaps, one of the most notorious is Signature Plastics, they also sell directly through their online retail store, but you may not find exactly what you need.
The solution is to participate in one of the many Group Buys that the Mechanical Keyboards community organizes. Accidentally there’s one that is running right now and that would very likely cover all your custom keyboard needs. It is called Granite Set and I personally designed it.
Next pick your switches. There are so many that I should dedicate a full post to them. Let’s limit the selection to Cherry MX. Cherry is the manufacturer, they produce the most famous switches for mechanical keyboards. They have many varieties, I like the clicky one called Cherry MX Blue, but you may prefer the light linear one (Red) or the tactile (Brown). They can be easily found on electronics stores such as Mouser or Fernell.
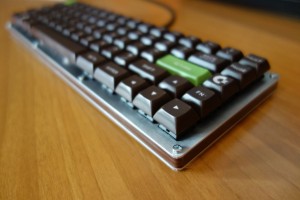
Next you need a case and the plate where the switches will be housed. The easiest way is to laser cut various layers of acrylic or aluminum and screw them together to build up your keyboard case.
You need to design all the layers with a CAD software such as Autocad or DraftSight that is free and runs on Windows, Mac and Linux. Some laser cutter also takes SVG files from Illustrator or Inkscape for example.
Here to spare some bucks I did a mixed Acrylic+Aluminum case layout. From the picture you can see the bottom plate that is aluminum (and later insulated to prevent shorts) and the sides are brown acrylics. The top plate –where the switches are actually accommodated– is again aluminum, but stainless steel or even wood also work pretty well.
The switches can be connected to the controller on a PCB or you can also hand-wire them directly. It’s a long task but it’s not too difficult and spares you the hassle of designing the PCB.
I tried both methods and admittedly the PCB is a cleaner solution, but one of my first custom keyboards was hand wired and it works like a charm.
Of course we don’t have a controller that can listen to 100 (one per switch) inputs, so we use a matrix. The switches are connected together in rows and columns instead of directly to the controller. This way we use just about 20 inputs to drive all the switches. To do so we need to add diodes to each switch; yeah, that means even more soldering. You can take any variant of the 1N4148 diode.
Next the controller. The Teensyis a very small USB HID compatible controller based on ATMega chip. It’s very common for custom keyboards because a nice guy cooked an incredibly good keyboard firware for it. It is called TMK Keyboard and you can find it on github. You can also probably use any of the Adafruit‘s or Sparkfun‘s controllers or even Arduino.
All rows and columns of the switches matrix have to be connected to the controller. Then you can burn the firmware, close the keyboard and enjoy your custom creation!
This is not a step by step tutorial but I hope it helped wetting your appetite. I personally have very little skills in electronics and my experience with CAD is limited to “draw-a-line”, but I was able to build my own keyboard from the ground up, so if I can do it nothing stops you from doing the same.
Lastly, there are few very good communities dedicated to Mechanical Keyboards where you can find inspiration and ask for help. One is Deskthority another is Geekhack or you may prefer the /r/MechanicalKeyboards sub-reddit.
Let me know if you end up building your keyboard!
 Layout and keycaps
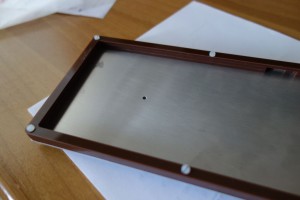 Plate and Case
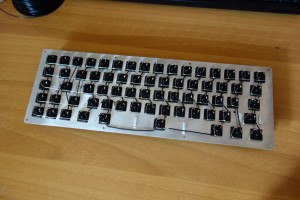 The PCB
 我要赚赏金
我要赚赏金 STM32
STM32 MCU
MCU 通讯及无线技术
 物联网技术
物联网技术 电子DIY
电子DIY 板卡试用
板卡试用 基础知识
基础知识 软件与操作系统
 我爱生活
我爱生活 小e食堂
小e食堂

