这些小活动你都参加了吗?快来围观一下吧!>>
电子产品世界 » 论坛首页 » 企业专区 » Renesas » 小庄稼人的Sakura学习笔记四:串口篇

共27条 1/3 1 2 3 跳转至

小庄稼人的Sakura学习笔记四:串口篇

专家
2012-11-24 14:55:18     打赏

小庄稼人的Sakura进程贴

组名:小庄稼人
组员:啸风、billy556、月嘉愚生


时间

进程名

位置

 2012-11-23  小庄稼人的申请贴                                      http://forum.eepw.com.cn/thread/222789/1
 2012-11-23  申请被被老王批准  http://forum.eepw.com.cn/thread/222789/1/#4
 2012-11-24  Sakura开发板相关信息                                          2
 2012-11-24  软件学习                                          3
 2012-11-29  收到Sakura板                                        10
 2012-12-01  Sakura学习笔记一:数字I/O篇                                        11
 2012-12-01  Sakura学习笔记二:模拟IO篇                                        12
 2012-12-01  Sakura学习笔记三:高级IO口篇(tone)                                       13
 2012-12-03  Sakura学习笔记四:串口篇(发送数据)                                       14


====================================================
Sakura板靓照:


关键词: 庄稼     人的     Sakura     学习     笔记     串口    

专家
2012-11-24 14:55:54     打赏
2楼
Sakura开发板相关信息

转自官网

Hardware specification 

Is the spec information of GR-SAKURA and GR-SAKURA-FULL.


    On-board MCU 32-bit high performance CPU
    ( R5F563NBDDFP ) RX63N 100-pin
    ▶ Operating frequency: 96 MHz (single precision FPU, on-chip multiplication/division)
    ▶ Flash ROM: 1M Bytes, RAM:128K bytes,
    ▶ Data flash:32K bytes
    ▶ Communication features: USB (host/function), Ether-MAC, I2C, SPI, CAN, IEBus
    ▶ Timers 16-bit (MTU, TPU, CMT), 8-bit TMR, WDT, independent WDT, PPG
    ▶ 12 / 10-bit ADC, temperature sensor, data transfer (DMAC, DTC)
    Board features ▶ USB function pins (mini-B): Download by USB mass storage (write)
    ▶ EtherNet (RJ45) pins : LAN such as Web server and remote download available
    ▶ USB host pins (A): applicable to Android-ADB-ADK
    ▶ MicroSD jacket: possible to share data with PC
    ▶ XBee ready pins: mount XBee module for wireless remote download
    ▶ Additional service pins for advanced timer input/outputs
    ▶ JTAG pins: E1 emulator debugging is possible
    Initial firmware Flash write downloader firmware based on USB mass storage
    Power supply 5V (USB bus-powered operation or AC adapter) (RX63N operates in 3.3V)


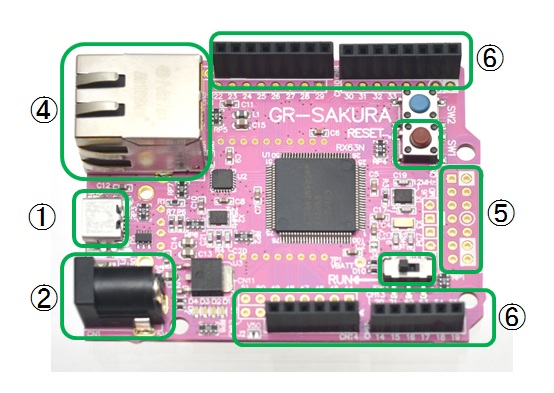
    (1) USB function connector - Connect to PC and Android phone (limited to the USB mass storage compatible devices)
    - USB bus-powered
    - Transfer rate 12Mbit / sec (bulk, interrupt, and control).
    Transfer user program in the RX63N built-in Flash memory
    (2) DC power jack (5 V) Use when the USB bus power is not enough
    (RX63N operates at 3.3V, which voltage generated by the on-board regulator IC)
    (3) USB host connector (type A) Solder the bundled connector on the back side of mini USB connector when needed. You can use it for the Android ADK.
    Please note that USB host and USB function can not be used simultaneously.
    (4) EtherNet (RJ45) connector 100 / 10 Mbps, internal pulse transformer
    (5) JTAG connector JTAG debugger (ready for Renesas-E1)
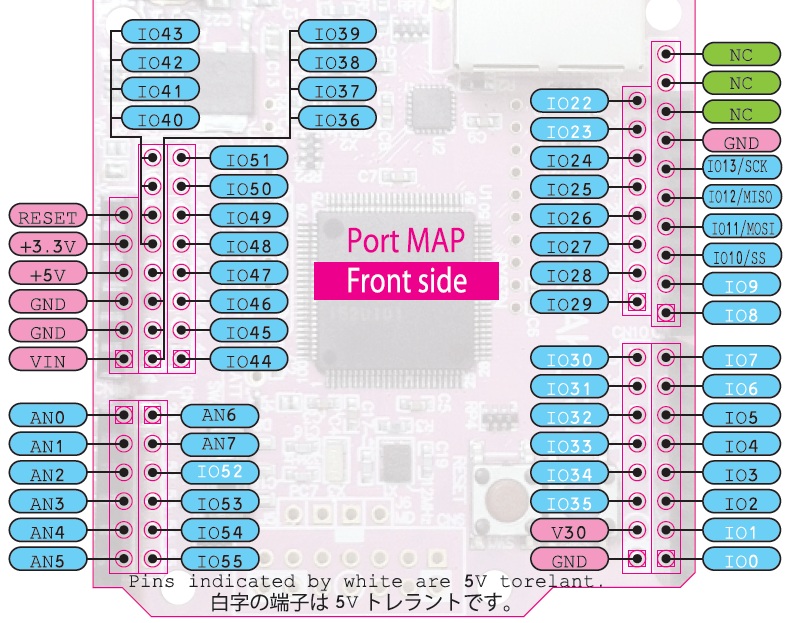
    (6) Arduino-compatible pins Pin and footprint compatible with commonly available Arduino shields. (Please note 3.3V and 5V tolerant pins)
    (7) Expansion pin In addition to pins in (6), the board offers auxiliary pins covering most of valid pins on the RX63N 100-pin package .
    (8) XBee ready pattern Xbee module can be mounted on this spot, which enables the board to communicate via Zigbee and Wi-Fi.
    (9) Micro SD card slot Access in SPI mode
    (10) Switch (Red or Brown) SW1 -- reset
    (Blue) SW2 – available for user
    (Slide) SW3 – change the RX63N operation mode
    (11) LED 4 pieces
    Use freely in the user program.


    On-board Jumper Setting Description (For more detail, refer to the GR-SAKURA circuit diagram)

    Grsakurajumpertop

    Grsakurajumperbot

    • J1: Bypass the reserve current protection diode when using USB  5V supply.
        (It avoids diode’s voltage drop. But it may cause a reverse current problem.
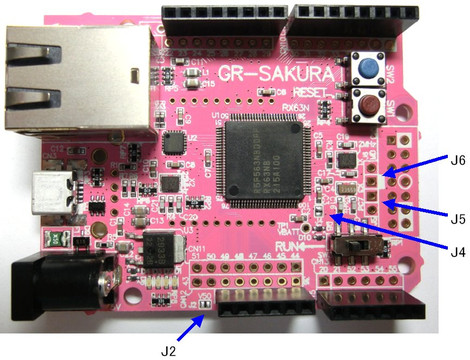
    • J2: V50 in Arduino is connected to 5V output of the regulator. GR-SAKURA has jumper J2 for isolation.
    • J3: VIN in Arduino is connected to DC input. GR-SAKURA has jumper J3 for isolation in case of supplying 5V.
    • J4: Cut J4 to disconnect AVCC (analog power supply) from VCC (digital power supply).
    • J5: During the boot mode,
      - USB boot when J5 is set to open
      - SCI boot when J5 is set to short-circuited
    • J6: Short-circuit this jumper when you want to use boot mode.
        (You don’t use this jumper since slide switch SW3 does the same setting.)
    • J7: Connect DOUT of the XBee module to P52/RXD2 of RX63N
    • J8: DIN of the XBee module to P50/TXD of RX63N
    • J9: RESET of the XBee module to P51 of RX63N
    • J10: RTS of the XBee module to P54 of RX63N
    • J11: CTS of the XBee module to PP55 of RX63N
    • J12: Connect J12 to have RX63N control the USB-host pull-down registers
    • J13: Connect the USB-host pull-down registers to the ground (permanent pull-down)
    • J14: Connect J14 to have RX63N control the USB-host pull-down registers
    • J15: Connect the USB-host pull-down registers to the ground (permanent pull-down)
       (Jumpers J12 – J15 can be set to open in normal use)
    • J16: Connect Vcc of the XBee module to the 3.3V supply of the GR-SAKURA board.
       (The XBee module consumes a large amount of current during it’s reset, causing the GR-SAKURA board being in an unstable operation. This jumper is useful for using an external 3.3V supply dedicated for the XBee module)
    • J17: This jumper connects RESET of Arduino connector CN14 to the system reset. When a connected Arduino shield outputs the 5V reset signal, it may damage the GR-SAKURA board. Therefore this jumper is set to open in default. Connect this jumper when the connecting shield will output the 3.3V reset signal or the open drain reset signal.


    When you start using GR-SAKURA with no shield, you don’t need to modify any jumper setting.

    The jumper setting is required in the following situations:

    ・When you use the XBee module, short-circuit J7,J8,J9,J10,J11, and J16
    ・When you use USB OTG, short-circuit J12 and J14.
    ・When you use USB-host mode, short-circuit J13 and J15(USB-function mode is also OK)
    ・When you use a Arduino shield operating in 5V supply, short-circuit J2.


专家
2012-11-24 14:56:38     打赏
3楼

Arduino的语法学习

 昨个前期的准备,先学习下语法,熟悉一下。在网上找到了一些Arduino的教程,觉得挺不错的。

相关教程:
Arduino教程.doc
Arduino最全的中文教程.pdf
动手玩转Arduino.zip

Arduino程序代码从结构上可以分为三个主要部分:结构、值(变量与常量)与功能。

setup()

程序刚启动时,调用setup()函数.用于初始化变量,设置针脚的输出/输入类型,配置串口,引入库文件等等. 每次Arduino上电或重启后,setup函数只运行一次.

loop()

在setup()函数中初始化和定义了变量之后,loop()函数,顾名思义,不停的循环,根据程序中的内容,根据一些反馈,响应改变执行情况。我们就用loop中的代码控制Arduino板。


void setup()
{
  //....
}

void loop()
{
  // ...
}


专家
2012-11-24 14:57:03     打赏
4楼
再占~~~~~~~~~~~~~·

高工
2012-11-24 17:52:55     打赏
5楼

挺详细的,,顶一下额,,希望去的好的成果哦!!!


高工
2012-11-25 11:58:02     打赏
6楼

有好资源,谢谢分享,加油啊!


高工
2012-11-25 12:07:41     打赏
7楼

啸风,你们的温湿度传感器准备用哪种啊?

准备用18B20不,应该你们会这个,我也在纠结用这种还是用模拟量的。

       18B20的一致性会好很多,但是读取时间长(100ms以上),功耗大,对电源的稳压性要求高(低于2.8V就误差大)。

模拟量的传感性一致性又差很多。因为我们采用电池无线方式所以对上述要求考虑的多一点.


有空多沟通沟通.


专家
2012-11-25 12:47:33     打赏
8楼

到时一起讨论噢 

院士
2012-11-26 10:10:37     打赏
9楼
优速快递:668026027918

专家
2012-12-03 17:34:32     打赏
10楼

Sakura板子已到,开始初步的学习

这里给大家分享两个Arduino的语法网站:
1、极客工坊整理的Arduino语法
http://wiki.geek-workshop.com/doku.php?id=arduino:arduino_language_reference

2、瑞萨官网的樱花Arduino语法
http://tool-cloud.renesas.com/Renesas/ref/library.html

板子靓照:


共27条 1/3 1 2 3 跳转至

回复

匿名不能发帖!请先 [ 登陆 注册 ]